Invoice Formatting in Tally – Steps for Tally Invoice Customization

Tally is the most popular accounting software used by thousands of small and medium-sized businesses in India. It is known for its ease of use, powerful features, and vast customization options. Invoicing is one of the most used features in Tally. Both Tally ERP 9 and Tally Prime offer users an option to create viable GST invoices.
The format of bill in Tally is pre-defined with basic customization options. However, only a handful of people know that there are options for invoice formatting in Tally. This article will tell you all the invoice customization options available in Tally. It guides you on how you can add Logo, Signature and Terms of Conditions in Tally Invoice.
Why Is Invoice Customization Important?
Invoices can be customized to fit the specific needs of an organization. Here are some of the main reasons why you need to customize the invoice format in Tally.
- Remove or add specific fields on the invoice depending on the requirement of users.
- Add terms and conditions, banking details, or any other custom note for customers on the invoice itself.
- Promote the brand through a bill by adding a brand name, logo, tagline, watermark, color, etc.
- Adjust the invoice size to save on printing cost.
- Add QR codes, digital signature, industry-specific details, and more.
What is Invoice Formatting in Tally?
Both Tally ERP 9 and Tally Prime offer inbuilt customization options. Inbuilt invoice formatting in Tally allows users to customize a few core invoice components like show/hide fields, details, or add a description. However, Tally also has a developer option, enabling other developers to add custom designs and layouts.
There are two different options for invoice formatting in Tally:
Suggested Read: Invoice Vs Bill Vs Receipt: What’s the Basic Difference
Customization Options through Printing Configuration
Tally provides many invoice formatting options related to the core fields of an invoice. Accountants can show or hide specific areas, columns, or details based on the organization’s requirements and compliances. All the formatting is done through Printing Configuration Setting.
Although Tally ERP 9 and Tally prime allow multiple formatting options, users can’t customize the colour, font, template, logo watermark, or any other appearance-related setting.
Here are some of the invoice customization options in Tally Prime:
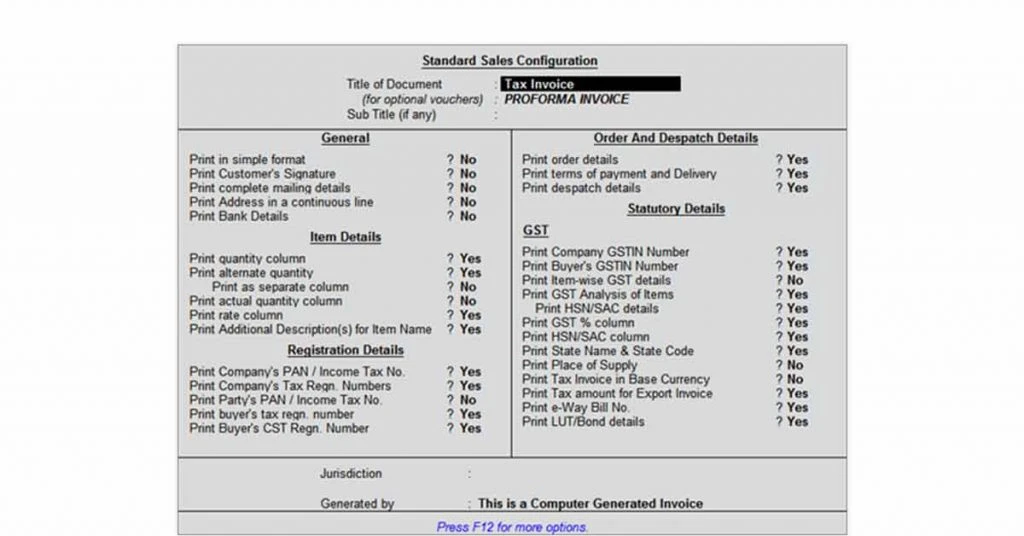
A. Standard Sales Invoice Configuration

General Customization: Add or remove customer’s signature, address, bank details, mailing details, etc.
Item Details: Show or hide quantity column, alternate quantity, actual quantity, rate, additional description for the item.
Registration Details: Show or hide Company’s/ Customers PAN, TIN, Tax Registration Number, Income Tax Registration Number, etc.
Dispatch and Order Details: Option to show or hide order details, terms of payment and delivery, and dispatch details.
Statutory Details: Show or hide company’s/ buyer’s GSTIN Number, item wise GST details, HSN/SAC column, supply and delivery state, e-Way bill number, base currency, etc.
Other Details: Custom invoice title, jurisdiction, and generation details.
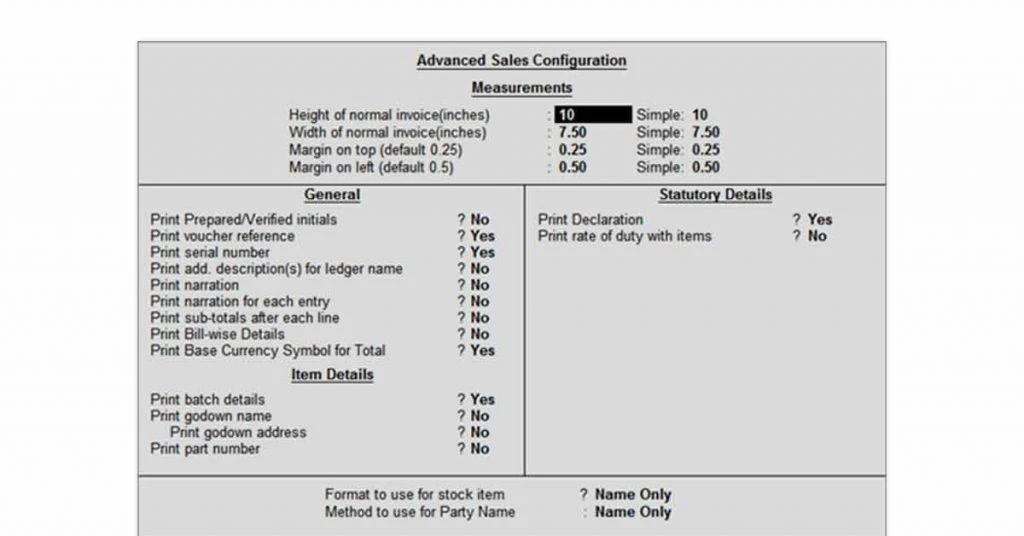
B. Advanced Sales Configuration

Measurements: Height, width, and margin of the Invoice
General: Show or hide initials, vouchers reference, serial number, narration, ledger name, bill wise details, etc.
Item Details: Show or hide batch details, Godown details, or part number.
Statutory Details: Show or hide declaration or rate of duty with items.
Third Party Customization
Tally doesn’t provide inbuilt options to customize the appearance of the bills. However, Tally has provided customization with TDL (Tally Definition Language). This allows users and programmers to extend the capabilities of Tally by writing their code. Advanced invoice formatting generally requires users to code and install add-ons as needed.
Users can either download pre-programmed TDL files or request custom TDL from 3rd party Tally solutions provider as per their requirement. However, 3rd party customization requires some technical knowledge and investment. Besides, the customization would only be limited to on-premises usage.
Formatting Options through Third Party Customization
- Adding authorized signature
- Brand logo and trademark addition
- Adding industry specific fields
- Adding QR code
- Changing background, font, colour, etc. of the bill
- Customized designs
- Change invoice captions
- Set any message on Invoice print, and much more
Suggested Read: Best Invoicing and Billing Software Vendors and Companies in India
Step By Step Guide to Invoice Formatting in Tally ERP 9
- Open Gateway of Tally
- Navigate to “Accounting Vouchers” or Press “A”
- Hit “F8” Key to open Sales Voucher Creation
- Create sales invoice
- Press the “Alt+P” Key to open Print Window.
- Press F12 to configure the printing of your sales invoice.
- Edit the required fields and add text (if any)
- Print The Invoice with Ctrl +P
Step By Step Guide to Tally Invoice Customization
Step 1: Use Custom Code

Custom code the required TDL files or download pre-programmed TDL files as per your requirements.
Step 2: Install the TDL file by
- Open “Gateway of Tally”
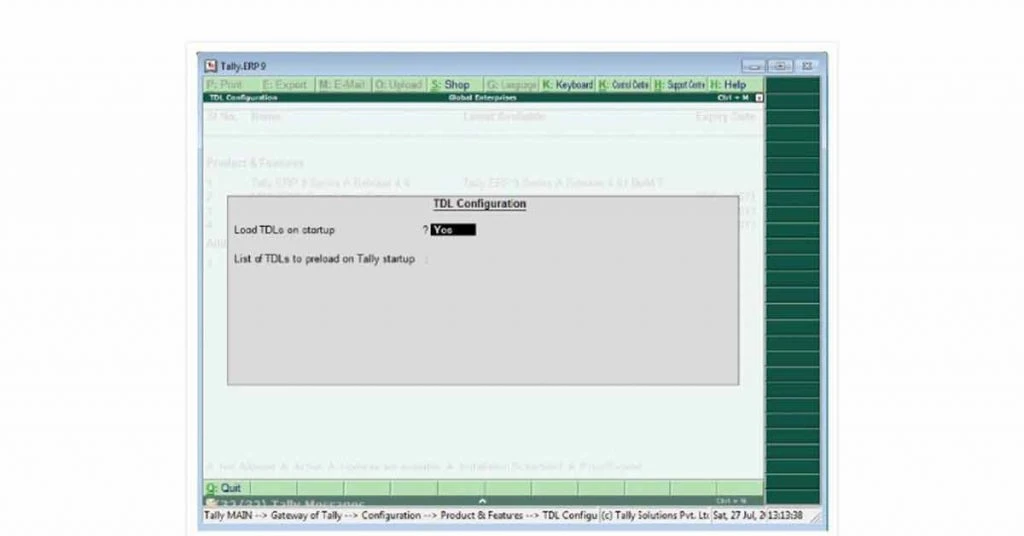
- Press: Ctrl + Alt+ T (OR) Hit F12> Navigate to “TDL Configuration”
- Press the “F4” key to load TDL Configuration
- Set Value to “YES” on “Load TDL’s in Start-up”
- Specify the Path to TDL File
- Press” CTRL +A” to save the file
Step 3: Use the customization Option
Once you install the add-on or TDL file, various options will be added to your configuration and print setting. These settings vary depending on the invoice customization add-on you have added.
Also, you will find documentation for the customs invoice format with the TDL file itself.
Suggested Read: Proforma Invoice Format: How to Create Proforma Invoice
How to Print Terms and Conditions in Tally Invoice?
Although Tally has an inbuilt option to print a specified message on Tally Invoice as “Declaration,” it doesn’t allow users to specifically print the “Terms and Conditions” clause on the Invoice.
However, Tally Website provides the add on to format sales invoice configuration so that the Terms and Condition field can be added to the Invoice.
Steps to Print Terms and Conditions in Tally Invoice
- Download the Add-on from Tally website
- Open “Gateway of Tally”
- Press F12
- Navigate to “TDL Configuration” OR Directly Press “Ctrl +alt+ T” on Gateway of Tally
- Press the “F4” key to load TDL Configuration
- Set “YES” on “Load TDL’s in Start-up” Field
- Specify the Path to TDL File
- Press” “CTRL +A” to save the file
- Navigate Back to Gateway of Tally
- Hit F11 to Open “Features”
- Go to Accounting Feature (or) Press “A”
- Navigate to “Print Terms & Conditions on Invoice” and set the value to “Yes.”
- Save by pressing” CTRL+ A.”
- Go to “Accounts info.”
- Navigate to “Voucher Types”
- Choose the “Alter” Option
- Select “Invoice”
- Navigate to “Set Terms & Conditions” and set value to “Yes”
- Write the “Terms and Condition” as per your need
- Press “Ctrl +A” to save all windows
Now, whenever you print any Invoice” Terms and Conditions” clause will appear at the bottom of the website.
Suggested Read: Best Sites to Download Free Invoice Templates
How to Add Sign in Tally Invoice?
Adding a Signature is extremely important in invoices for authorization of a bill. However, Tally doesn’t have any inbuilt option to add the Signature of the authorized personnel. However, custom TDL code enables Tally users to add Signature in the Tally invoice.
Here are the steps to add Signature in Tally Invoice
- Download or buy the required Signature Add-on TDL file
- Open “Gateway of Tally”
- Press F12 to open “Configuration.”
- Navigate to “TDL Configuration” OR Directly Press “Ctrl +alt+ T” on Gateway of Tally
- Press the “F4” key to load TDL Configuration
- Set “YES” on “Load TDL’s in Start-up” Field
- Specify the Path to TDL File
- Press “CTRL +A” to save the file
- Navigate Back to Gateway of Tally
- Hit F11 to Open “Features”
- Go to Accounting Feature (or) Press “A”
- Navigate to “Enable Signature Print” and set the value to “Yes.”
- Set the Signature Name and Path of the Image file
- Save by pressing “CTRL + A”
- Go to “Accounting Voucher”
- Select the name of” Authorized Signatory” at the bottom of the Invoice
- Press “Ctrl +A” to save the Invoice
Whenever you print an Invoice,” Signature” will appear at the bottom of the Invoice.
How to Print Logo in Tally ERP 9 Invoice?
Adding Logo in Invoice helps to build the brand value of organizations. Although Tally ERP has no inbuilt function to add Logo on Bills, you can download and install a custom-coded invoice Logo add-on.
Here are the steps to add Logo in Tally ERP 9 Invoice
- Download the required Logo Addition Add-on TDL file
- Open “Gateway of Tally”
- Press F12 to enter Configuration
- Navigate to “TDL Configuration” OR Directly Press “Ctrl +alt+ T” on Gateway of Tally
- Press the “F4” key to load TDL Configuration
- Set “YES” on “Load TDL’s in Start-up” Field
- Specify the Path to TDL File
- Press” CTRL +A” to save the file
- Navigate Back to Gateway of Tally
- Hit F11 to Open “Features”
- Go to Accounting Feature (or) Press “A”
- Navigate to “Enable Company logo” and set the value to “Yes”
- Define the Location of Company Logo
- Save by pressing “CTRL+ A.”
- Go to “Accounting Voucher”
- Make and Invoice (OR) Alter an existing Invoice
- Press “Ctrl +A” to save the Invoice or “Ctrl +P” to print the Invoice
Suggested Read: How Automated Invoice Processing Works for Quick Payments
How to Add a Logo in Tally Prime?
However, Tally Prime allows users to add Logo in 4 simple steps.
- Go to Gateway of Tally
- Select “Accounting Voucher” or hit “A” key
- Press Alt+P to enter Printing Window
- Select “Configuration”
- Navigate to “Show Company logo” and set the value to “Yes”
- Define the Location of Company Logo
- Define the Image Path
- Type Image File Name
- Print the Invoice
Note: Tally with GST and Tally Prime have an inbuilt option to add Logo on Invoice. Therefore, you don’t require any add-on.
FAQs
How do I download TDL?
TDL files are provided mainly by 3rd party Tally solutions providers like Antraweb, Tally Master, Anita International, etc. You can either request a custom coded TDL file or buy an existing TDL file from their official websites.
How to change invoice format in Tally ERP 9?
You can change the invoice format in Tally ERP 9 in two ways:
1. Altering the print configuration and enabling or disabling required fields.
2. Using custom Tally Defined Language (TDL) files. Users can change Invoice Format in Tally by navigating to Gateway of Tally > Accounting Features or pressing Ctrl+P > Configuration in Accounting Voucher Window.How to create invoice format in Tally?
Tally has its prebuilt Invoice format, which can be customized on Sales Voucher Setting. However, if you want to create a custom Invoice format, you have to write TDL code and install it as per your requirements.
How do I change the invoice format in Tally Prime?
You can change the invoice format in Tally by Pressing Ctrl+P and configuring the print settings. The print configuration allows users to show/hide fields, details, caption, description, print logo, etc.
What is the invoice format?
Invoice format is the appearance and layout of how different fields like date, particulars, rate, quantity, buyer name, GST numbers, etc. are placed in an Invoice.
Related Categories: Billing And Invoicing Software | Retail Billing Software | Accounting Software
Rajan is pursuing CA with a keen interest in trends and technologies for taxation, payroll compliances, Tally Accounting, and financial nuances. He is an expert in FinTech solutions and loves writing about the vast scope of this field and how it can transform the way individuals and businesses... Read more


