In the world of mobile video editing, KineMaster stands out as a versatile and powerful tool that empowers creators to produce professional-quality videos directly from their smartphones or tablets.
Whether you’re a seasoned content creator or just starting out, mastering KineMaster can elevate your video projects with its intuitive interface and comprehensive suite of editing features.
From adding layers of multimedia content to applying sophisticated effects and transitions, KineMaster offers a seamless editing experience tailored to meet diverse needs. If you were searching for how to use KineMaster then this article is right for you. We will look at the entire procedure of using KineMaster to bring your video ideas to life.
What is KineMaster?
KineMaster is a game-changing mobile video editing software available for both Android and iOS, packed with professional editing tools perfect for beginners and pros alike. Its user-friendly interface lets you craft polished, high-quality videos directly from your smartphone or tablet.
Dive into multi-layer editing to seamlessly add videos, images, text, stickers, and special effects, all while enjoying precise control over trimming, splicing, and cropping. With advanced features like chroma key compositing, and blending modes, KineMaster video editor offers unmatched versatility, making it your go-to tool for any video project.
How to Edit in KineMaster?
If you were searching for how to make a video in KineMaster app, then follow the below steps:
Step 1: Prepare Concepts and Materials
First, find out the message you want to deliver with your videos and search for relevant videos for it. This is especially important if you want to create videos for ads and similar promotional content.
Step 2: Open the App and Create a New Project
When you open your app, you will see an option to create a new project or work on the existing project.
If you are working on a new project, go to Create New Project and choose the right aspect ratio for your video. This aspect ratio will depend on where you want to publish your video.
For example, for YouTube videos you can keep it 16:9 while for Instagram, 9:16 is recommended.
After that, go to the Media Browser section. This folder will have multiple images and videos. Choose the video clip you wish to edit, which imports it into the project window. Once selected, tap the checkmark at the top-right corner to save the clip. Repeat these steps to include additional video clips as needed
Step 3: Start Trimming Your Videos
To start with trimming, choose the video you wish to customize, and its border will appear in light yellow. Next, select the scissors icon (Trim/Split menu) at the topmost right corner to view multiple trimming options.
You will get four options for this like Trim to Right of the Playhead,Split at Playhead, Split and Insert Freeze Frame, and Trim to Left of Playhead.
If you want to cut your clip to only a video that pops up after the current position, choose Trim to Right of Playhead. This will create video with a short duration.
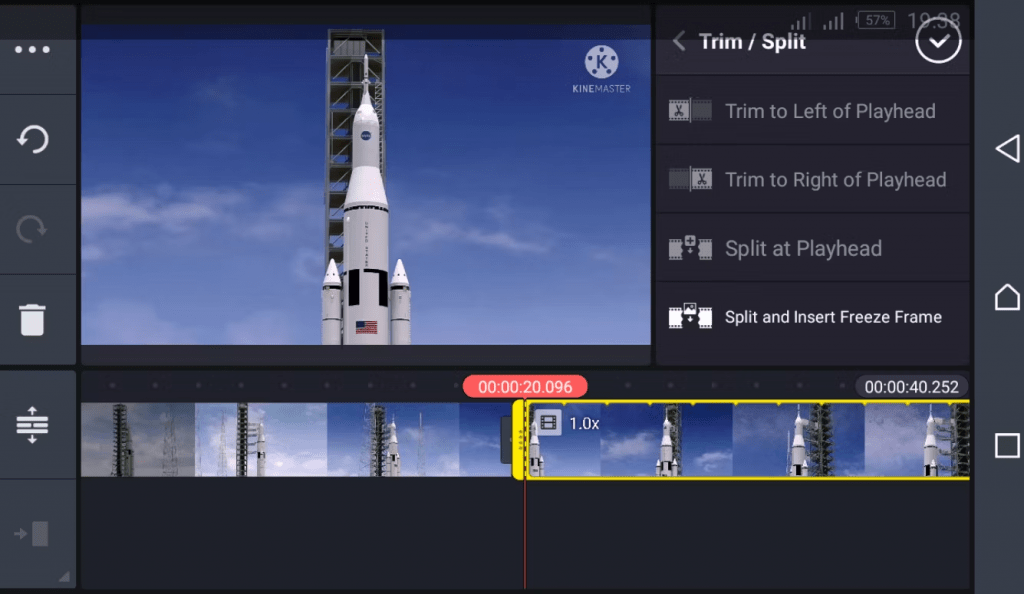
To view your progress, click on the Play button and view the video while editing. If you are happy with the video, then choose Checkmark on the top to save it.
Step 4: Insert Video Transitions
On the screen, you will see an option Plus (+) on the sides of your video. When you tap it, you will get multiple options to add transitions in your video.
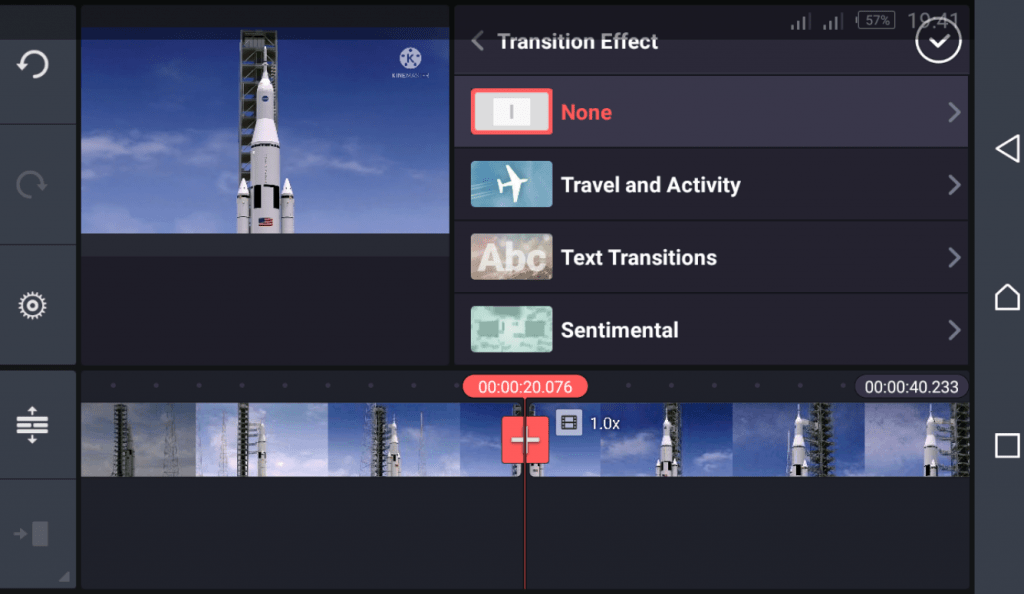
Choose from available transitions such as classic ones, 3D transitions, text transitions, and a lot more. Once you have selected the transition, select the Tick Mark in the upper section to save it.
Step 5: Insert Text to the Video
For that, you need to open the Layer icon where you get multiple options. From there, you can select the Text option.
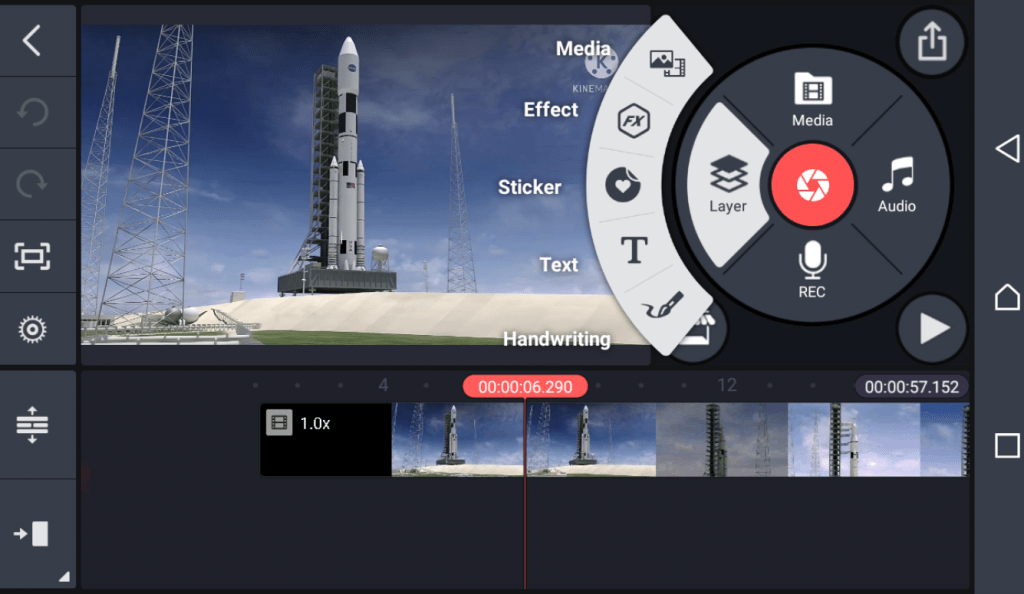
Type your text and press OK to display it across the video. To resize the text, simply tap and drag it to make it larger or smaller.
Next, tap the Aa symbol on the right to choose a font that matches your video’s tone. Once you’re satisfied, hit the Checkmark in the top-right corner to save your changes in KineMaster video editor. You can also enhance your text with additional elements like color, shadow, background, and animation effects. For the text color adjustment, select the White Circle and choose the color.
Step 6: Add Background Music
In order to add music to the video, keep the vertical red line on the project sheet where the music will begin. Next, hit the Audio button in the main tool bar and select a suitable soundtrack from your device. Further, you can also import tracks from the KineMaster’s Audio Browser.
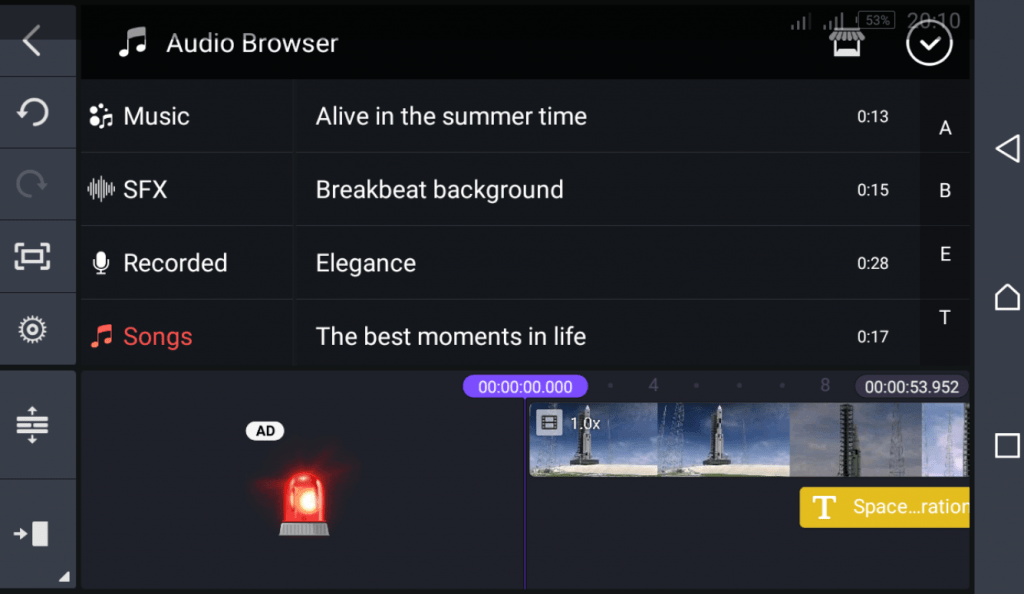
After you select the music, select the Plus sign to add music to your video and the track will start playing. Once you are satisfied with the song, again hit the Plus sign to save it.
Step 7: Export Your Video
Once you are done editing your videos, you can export the video in your desired resolution and frame rate with Export button at the top-right corner.
The exported video can be seen on the top right. You need to go the Share symbol to upload the generated video on YouTube, social media, or to any app available in your phone.
Essential Features of KineMaster
Take a look at some of the important features you get with KineMaster to create stunning and captivating videos:
- Chroma Key: Now, you can composite all your green videos with your other videos via a Chroma Key. It also offers Alpha Mask, Preview, and Fine-Tuning options for this purpose.
- Magic Remover: Try its AI-based magic remover to remove all or some of the background areas from your videos.
- Transparent Backgrounds: Do you want to create videos with transparent background on your smartphone? Try the transparent backgrounds offer by this video editing software. You can also use its alpha videos as media sources in your other video projects or with Apple’s Keynote.
- Image Quality Enhancer: Say bye to the low-resolution media and enhance your media quality with its Super Resolution plug-in.
- Video Speed and Reverse: KineMaster app lets you create slow motion and speed up the videos by adjusting the playback speed. You can adjust speed from ⅛x to 16x and reverse playback can also be done.
- Color Filter and Adjustment: You can elevate your footage by tweaking the contrast, brightness, saturation, hue, and temperature. Additionally, fine-tune the highlights and shadows, or even change the overall style to enhance the visual quality.
- AI Style: Unlock the power of cutting-edge AI filters and transform your videos and images into stunning masterpieces.
- Audio Editor: Explore powerful audio editing features like pitch control, volume envelope adjustments, reverberation, voice modulation, etc., to transform your sound.
- 4K Media Export: KineMaster video editor lets you unleash your creativity with support for up to 4K resolution and 60 FPS. Create stunning UHD and FHD videos, and even fun GIFs, all with professional-grade quality.
- Media Assets: Unlock your creative potential by downloading thousands of high-quality stickers, fonts, videos, effects, etc., from the KineMaster Asset Store.
- Royalty Free Music: Discover Copyright-Free BGMs! Dive into the KineMaster Asset Store and download thousands of top-quality background music tracks and sound effects (SFX) to elevate your projects.
Conclusion
Mastering KineMaster app opens a world of possibilities for creating engaging and visually stunning videos on the go. By leveraging its robust editing tools and extensive asset library, you can transform ordinary footage into compelling stories that captivate audiences. Whether for social media content, vlogs, tutorials, or business presentations, KineMaster empowers creators to unleash their creativity and achieve professional results. Embrace the versatility and convenience of mobile editing with KineMaster, and watch as your video projects thrive with polished visuals and impactful storytelling.

Written by
Varsha ![]()
Varsha is an experienced content writer at Techjockey. She has been writing since 2021 and has covered several industries in her writing like fashion, technology, automobile, interior design, etc. Over the span of 1 year, she has written 100+ blogs focusing on security, finance, accounts, inventory, human resources,... Read more