Filmora is a popular video editing software that has become popular in the market for being user-friendly while offering a range of powerful features. Whether you’re a beginner or an experienced video editor, Filmora provides the tools you need to create professional-looking videos with ease. In this article, we’ll guide you through getting started with Filmora, from installation to mastering its main features and tools.
System Requirements and Installation of Filmora
Getting started with Filmora is quite straightforward. However, before getting into the depth of Filmora, it becomes important to ensure that your computer meets the system requirements. Below are the basic requirements:
- Operating System: Windows 7/8/10 (64-bit), macOS 10.11 or later
- Processor: Intel i3 or better multicore processor, 2GHz or higher
- RAM: 4GB (8GB recommended for HD and 4K videos)
- Graphics Card: Intel HD Graphics 5000 or newer; NVIDIA GeForce GTX 700 or newer; AMD Radeon R5 or newer
- Disk Space: At least 10GB of free space
How To Install Filmora
Follow the steps mentioned below to install Filmora in your system:
- Visit the official Filmora website.
- Download the installation file for your operating system.
- Run the downloaded file and follow the on-screen instructions to complete the installation.
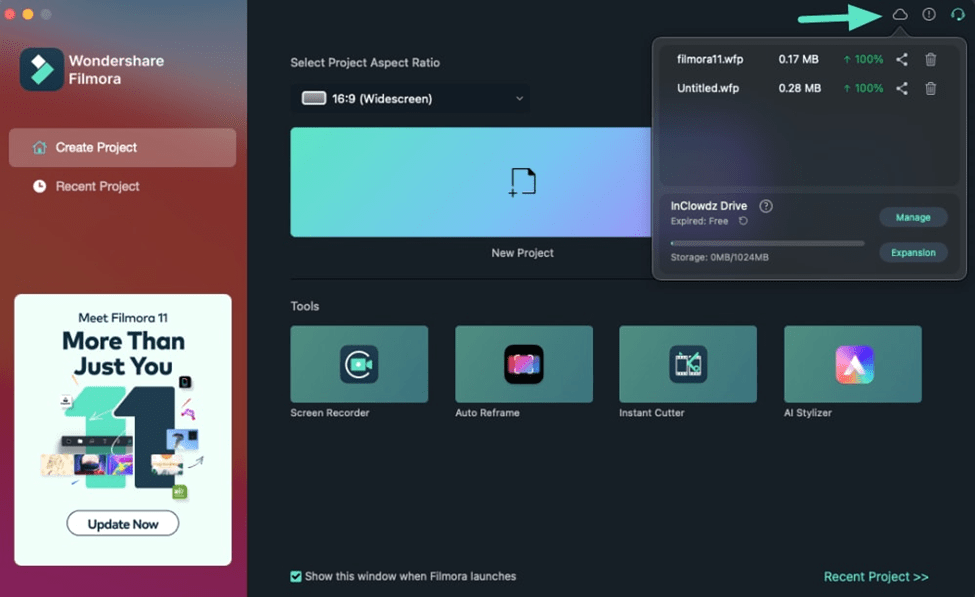
Launching Filmora for the First Time
After installation, open Filmora by double-clicking its desktop icon or finding it in your applications folder. The welcome screen offers options to start a new project or open an existing one.

Wondershare Filmora
Starting Price
₹ 3399.00 excl. GST
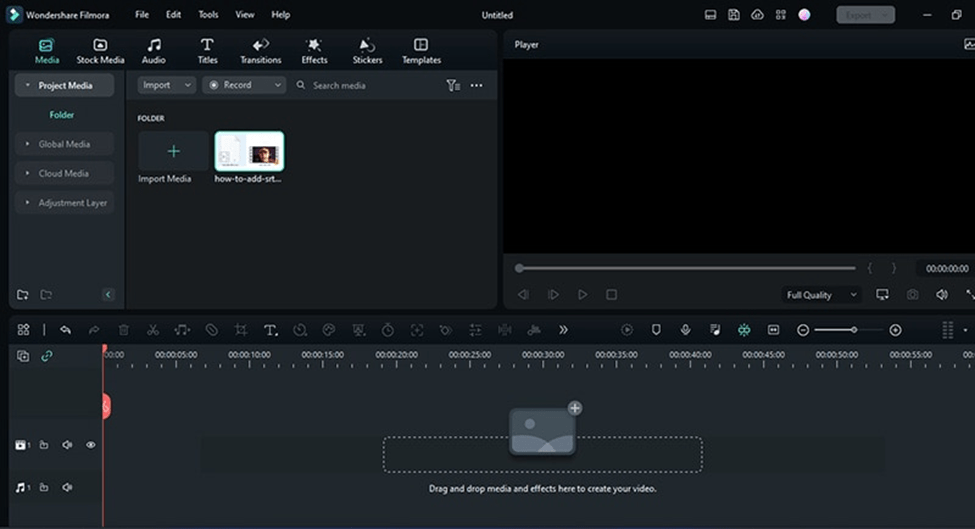
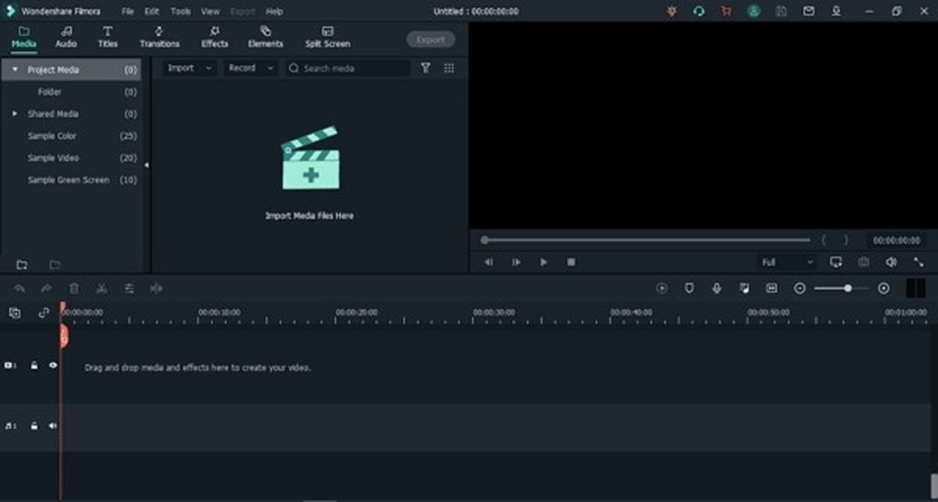
Understanding the Interface of Filmora
Filmora’s interface is designed to be intuitive, even for beginners. It consists of the following main sections:
- Media Library: The top left section is for importing and managing media files.
- Timeline: The bottom section is where you assemble and edit video clips.
- Preview Window: Top right section for previewing your project.
- Toolbar: Above the timeline, providing quick access to various editing tools.
Filmora Key Features and Tools
Filmora offers a variety of features and tools to help you create engaging videos. Some of the key tools include:
- Importing Media: Easily import videos, photos, and audio files from your computer.
- Cutting and Trimming: Remove unwanted parts of your video clips.
- Transitions and Effects: Add transitions and visual effects to enhance your videos.
- Text and Titles: Insert text and title templates to add context to your videos.
- Audio Editing: Adjust audio levels, add background music, and more.
- Color Correction: Improve the look of your videos with color correction and grading tools.
- Green Screen: Replace a green or blue background with a different scene.
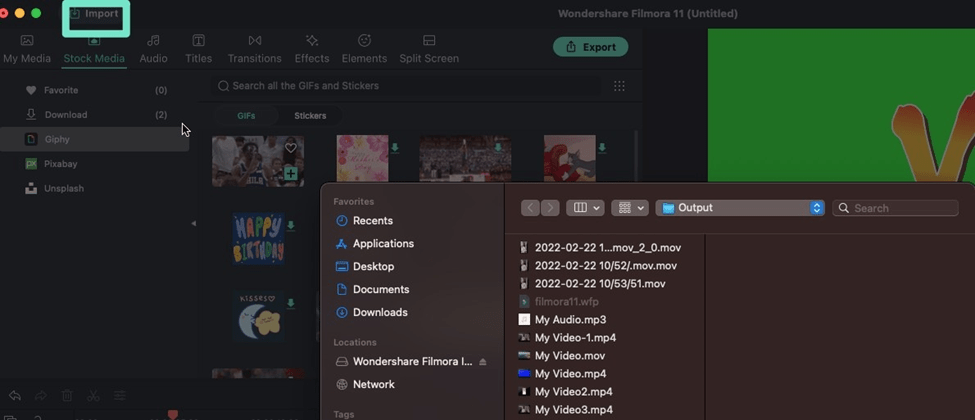
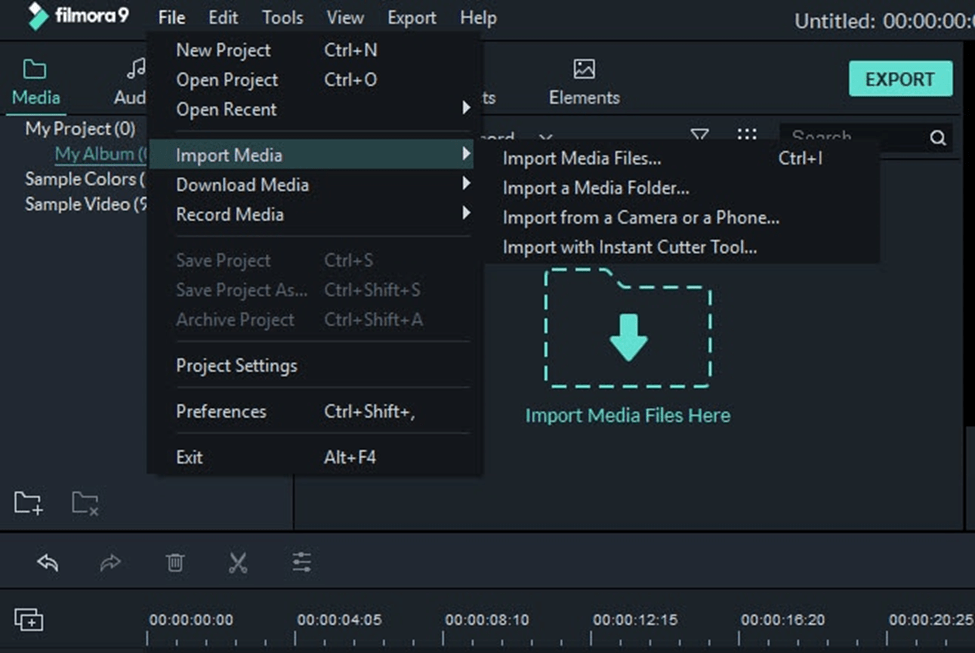
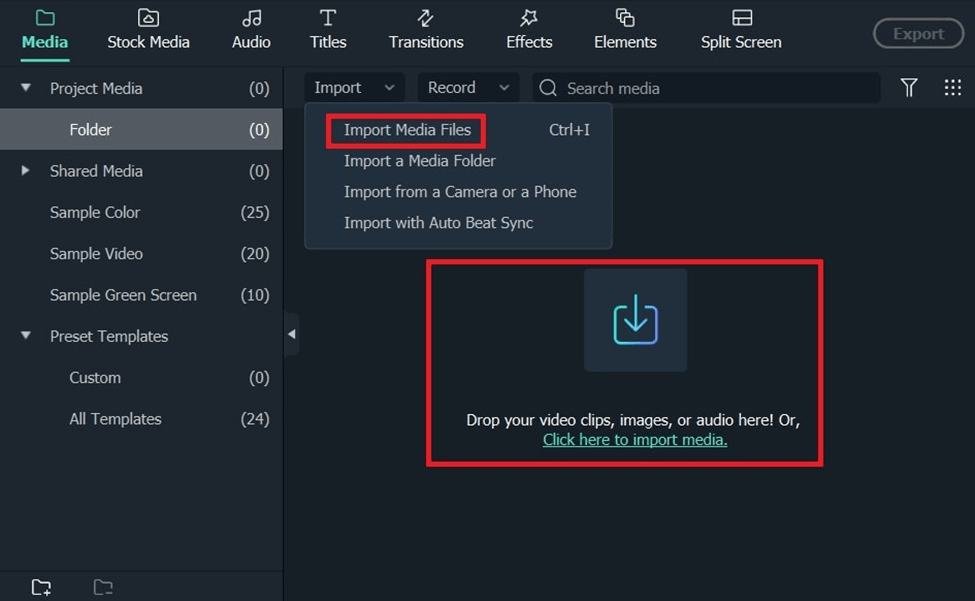
Importing Media Files in Filmora
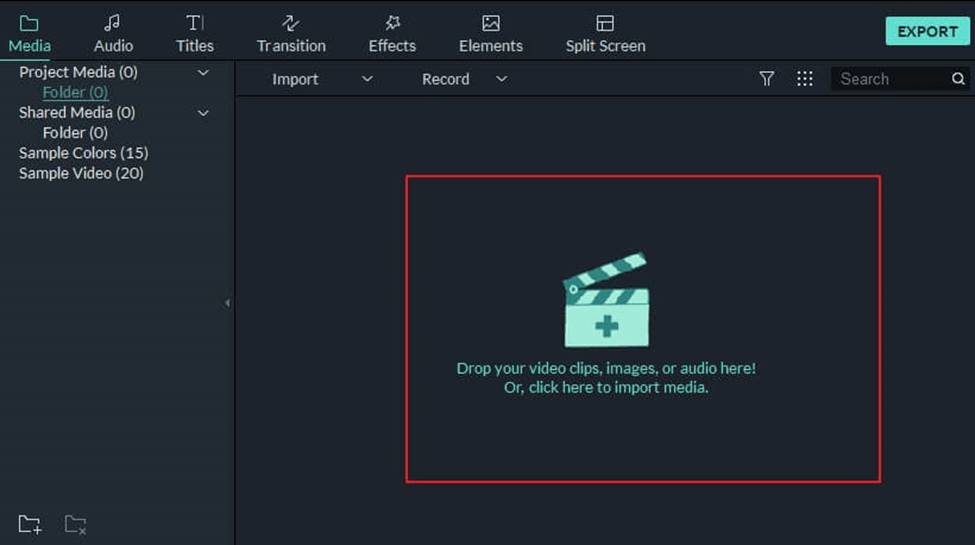
To start editing, you’ll need to import your media files into Filmora. Follow these steps:
- Click the “Import” button in the Media Library.
- Select the media files (videos, photos, audio) you want to use in your project.
- Click “Open” to add them to your Media Library.
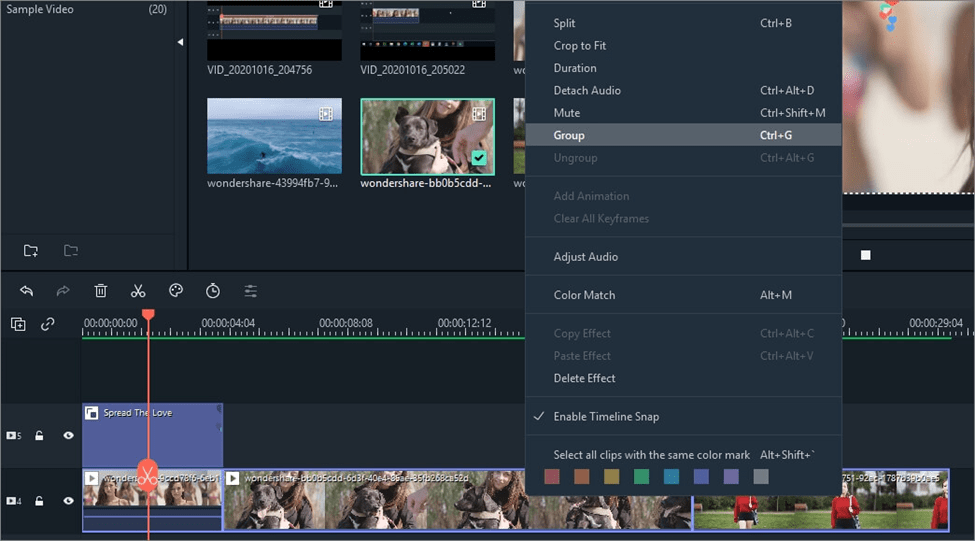
Organizing Your Media Library Using Filmora
Organizing your media files can save you time and make the editing process smoother. Here are some tips:
- Folders: Create folders in the Media Library to categorize your files (e.g., videos, photos, music).
- Tags: Use tags to label and quickly find specific files.
- Favorites: Mark frequently used files as favorites for easy access.
How to Cut Video with Filmora
Cutting and trimming are fundamental editing techniques that help you refine your video. To cut or trim a clip:
- Drag a clip from the Media Library to the timeline.
- Position the playhead where you want to cut.
- Click the “Split” button to cut the clip.
- Drag the edges of the clip to trim it.
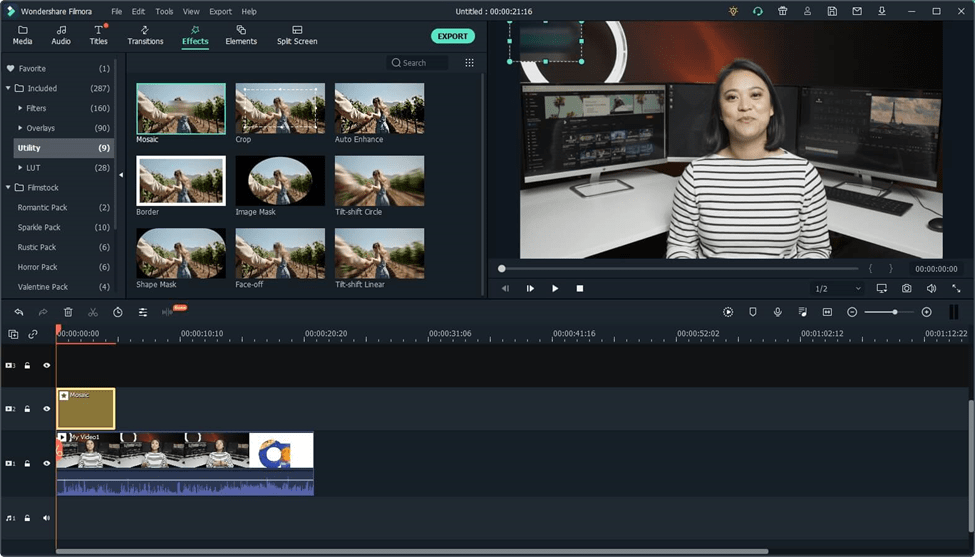
Adding Transitions and Effects in Filmora
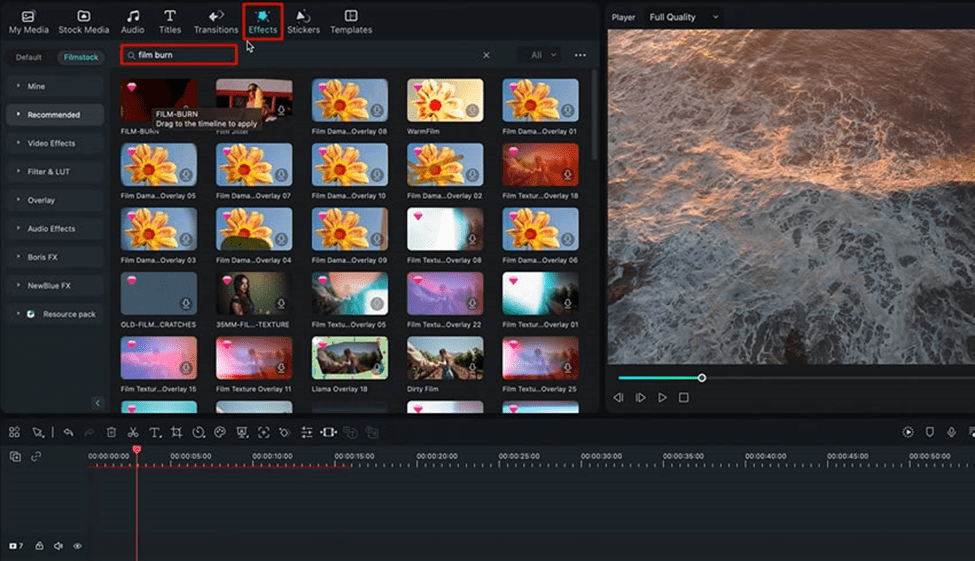
Transitions and effects can make your video more engaging. Here’s how to add them:
- Go to the “Transitions” or “Effects” tab.
- Drag a transition or effect to the timeline.
- Drop it between clips (transitions) or on top of a clip (effects).
Inserting Text and Titles in Filmora
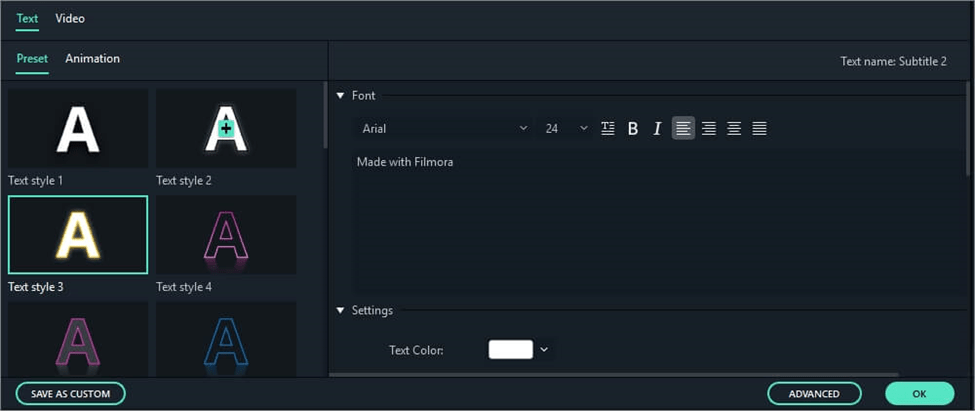
Adding text and titles can provide context or emphasis to your videos. To insert text or titles:
- Click the “Titles” tab in the Media Library.
- Choose a text or title template and drag it to the timeline.
- Double-click the text/title clip in the timeline to edit the text and customize the style.
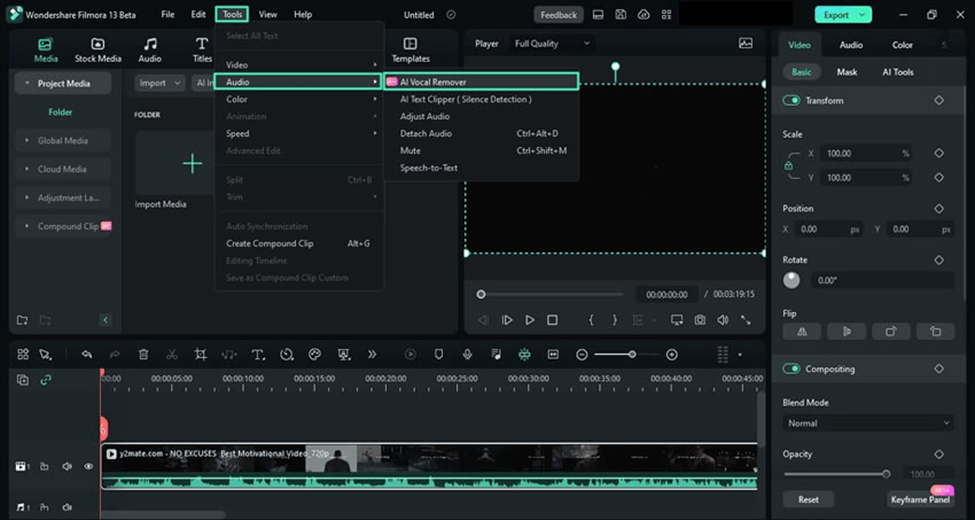
Audio Editing in Filmora

Good audio is crucial for a professional-looking video. Filmora offers various audio editing tools:
- Detach Audio: Right-click a video clip and select “Detach Audio” to separate the audio.
- Adjust Volume: Use the volume slider in the toolbar.
- Audio Effects: Add effects like fade in/out by right-clicking the audio clip.
Color Correction and Grading in Filmora
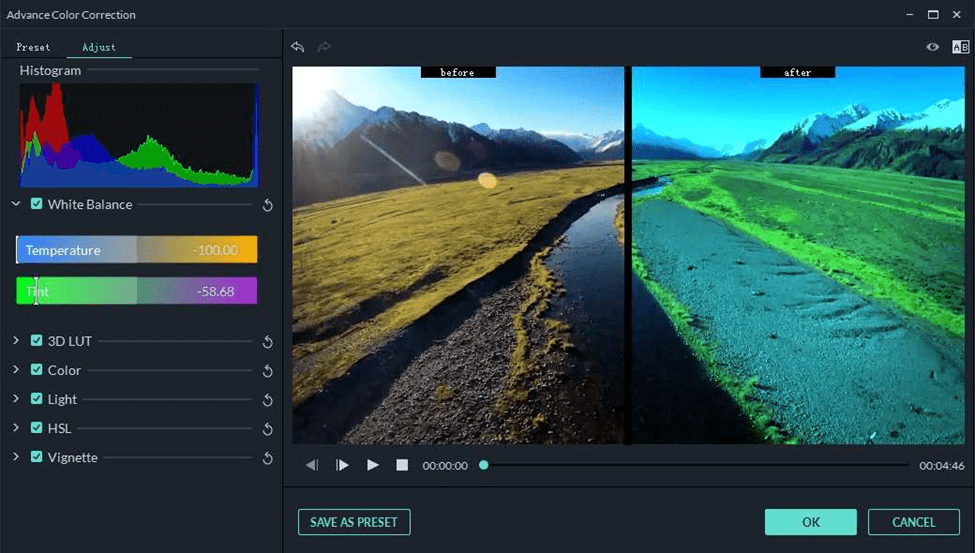
Enhance the visual quality of your videos with color correction and grading:
- Select the clip in the timeline.
- Click the “Color” button to open the color correction panel.
- Adjust settings like brightness, contrast, and saturation.
- Use the “Color Grading” tab for advanced adjustments.
Using Green Screen (Chroma Key) in Filmora
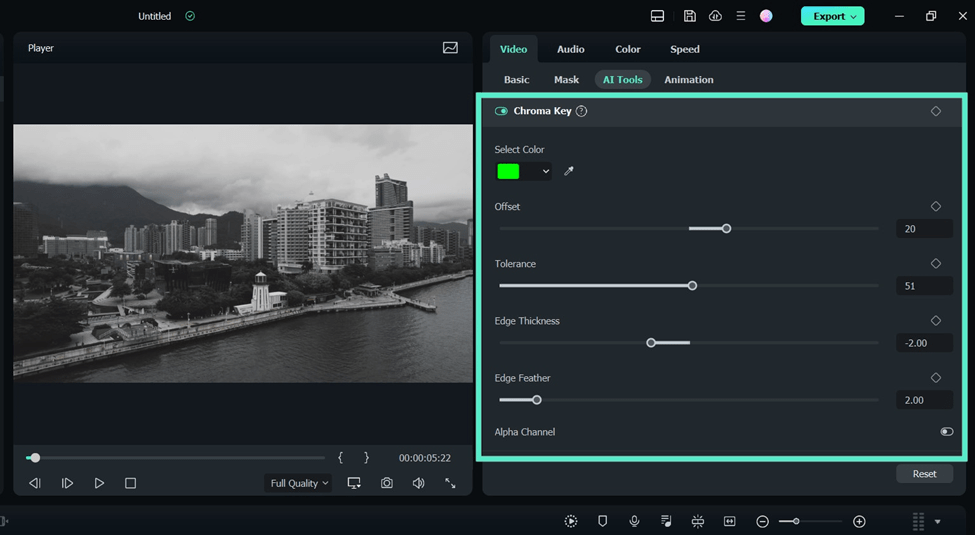
Filmora’s green screen feature allows you to replace a green or blue background with a different scene:
- Place your green screen footage on the timeline.
- Add the background footage below the green screen footage.
- Double-click the green screen clip to open the editing panel.
- Enable the “Chroma Key” option and adjust the settings.
How to Remove Filmora Watermark
The most important questions that users ask while using Filmora, are “How to remove watermark from Filmora” “Does Filmora have a watermark” How to Remove Filmora Logo, or “How to remove Filmora watermark for free”.
So, we have a solution for it. To remove the Filmora watermark, you can either purchase a license or use a free method. Here’s how:
Paid Method:
1. Buy a license from Filmora’s official website.
2. Activate Filmora with the provided code.
3. Re-export the video without the watermark.
Free Method:
Free Trial: Use the free trial, but it will include a watermark.
Third-party Tools: Some online tools claim to remove watermarks but may affect video quality.
claim to remove watermarks but may lower video quality or violate terms of service.
How to Edit Videos on Filmora
Editing videos in Filmora requires you to follow a few simple steps:
- Import: Add your video files.
- Drag and Drop: Place your video in the timeline.
- Cut and Trim: Use the scissors tool to cut and drag edges to trim.
- Add Transitions: Drag transitions between clips.
- Add Effects: Drag effects onto clips.
- Add Music: Drag music to the audio track.
- Export: Click “Export” to save your video.
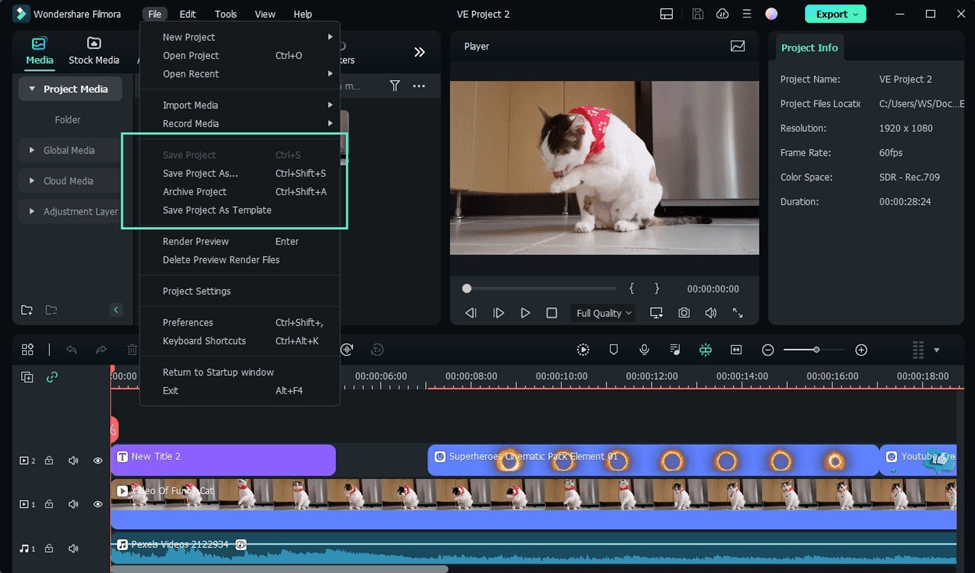
How to Change Frame Rate in Filmora
Changing the frame rate can make your video look smoother. Here’s how you do it:
- Open Project Settings: Open your project in Filmora and click on “File” at the top left corner.
- Select Project Settings: From the dropdown menu, choose “Project Settings”.
- Change Frame Rate: In the project settings window, find the “Frame Rate” option. Select your desired frame rate from the dropdown menu (e.g., 24 fps, 30 fps, 60 fps).
- Apply and Save: Click “OK” to apply the changes.
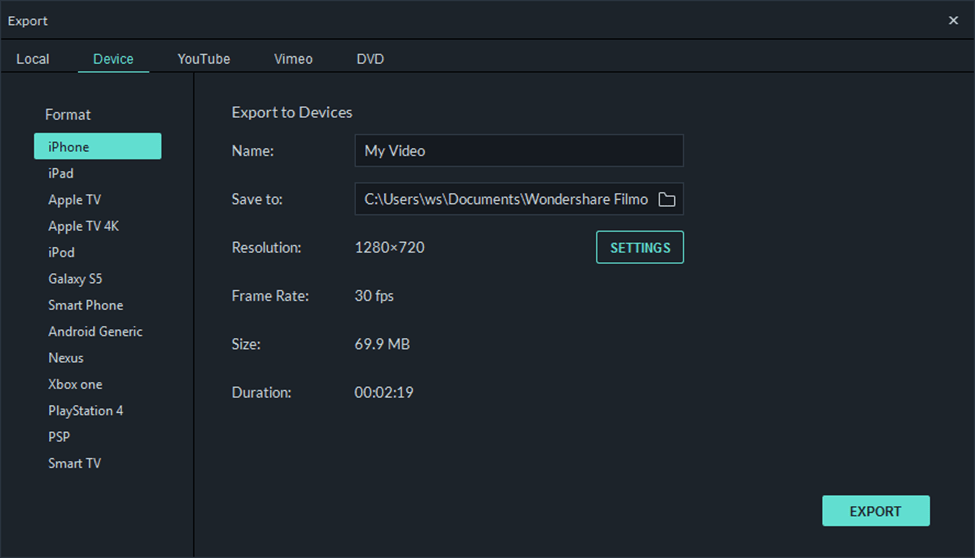
How to Change the Resolution of a Video in Filmora
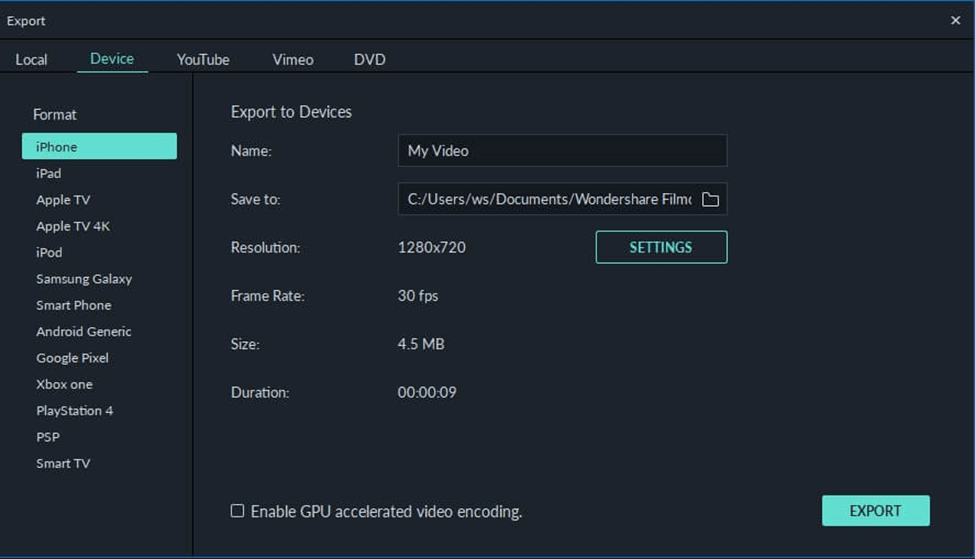
To change the resolution of your video, follow these steps:
- Import Your Video: Load your video into Filmora.
- Open Export Settings: Click on “Export” to open the export settings window.
- Choose Resolution: In the export settings, find the “Resolution” dropdown menu. Select the resolution you want (e.g., 1920×1080 for HD).
- Export the Video: Click “Export” to save your video with the new resolution.
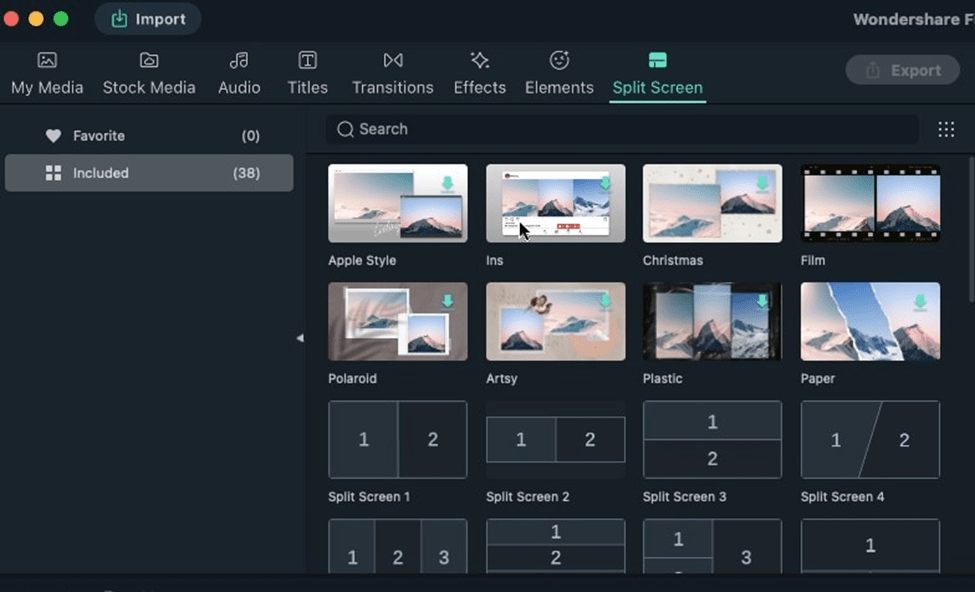
How to Use Split Screen in Filmora
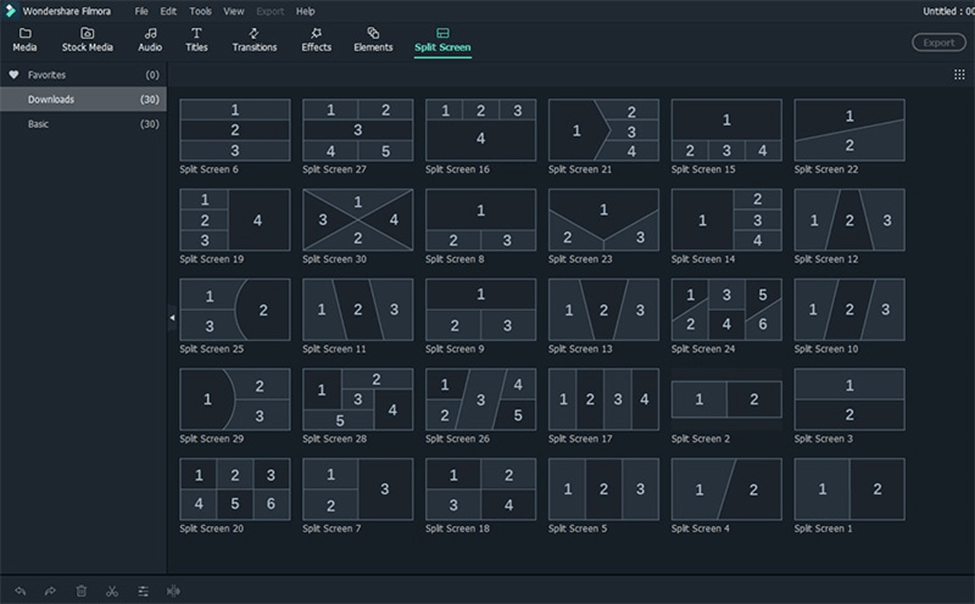
A split screen allows you to show multiple videos at once. Here’s how:
- Go to the “Split Screen” tab.
- Choose a template.
- Drag videos into the slots.
- Adjust clip positions and sizes.
- Export the video.
How to Make 8D Audio in Filmora
8D audio can make your music feel like it’s moving around you. Here’s how you can create it:
- Import your audio file.
- Open the “Audio Mixer”.
- Adjust panning to move sound.
- Add reverb or echo effects.
- Export the audio.
How to Remove Noise from Video in Filmora
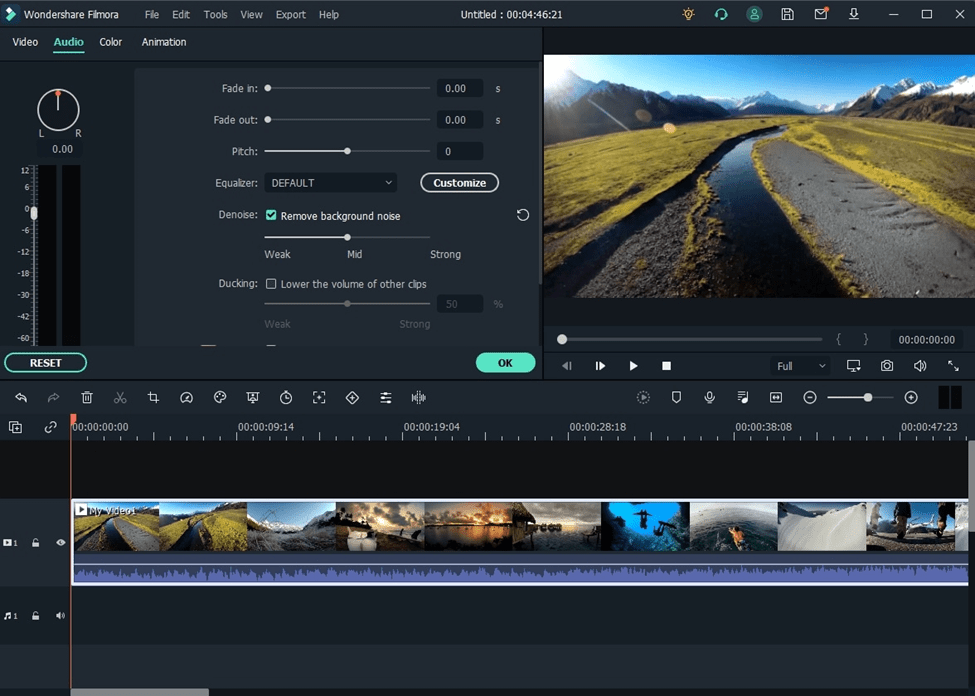
Removing noise can make your video sound clearer. Here’s how:
- Load your video.
- Open “Audio Settings”.
- Enable “Denoise” and adjust the strength.
- Preview and export the video.
How to Speed Up Video in Filmora
Speeding up a video can make it more dynamic. Here’s how:
- Load your video.
- Select the clip.
- Click the “Speed” icon and choose “Fast” and select how much faster you want the video to play (e.g., 2x, 4x).
- Preview and export the video.
How to Convert Filmora to mp4 Online
Converting your Filmora project to MP4 online is easy. Here’s how:
- First, export your video from Filmora in any format.
- Go to a trusted online video converter website like OnlineConvert or Convertio.
- Upload your exported video file.
- Choose MP4 as the output format.
- Click “Convert” and wait for the process to finish. Then, download your MP4 file.
How to Convert Filmora Video to VLC
To play your Filmora video in VLC, follow these steps:
- Export your video in any common format like MP4.
- Open VLC Media Player.
- Drag and drop your video file into VLC or use the “Open File” option to load your video.
- Play your video.
How to Save Video in Filmora
Saving your video in Filmora is straightforward. Here’s how:
- Complete your edits.
- Click “Export”.
- Select the desired video format and adjust the quality settings.
- Name your file and choose the save location.
- Click “Export” again to save your video.
Exporting Your Video in Filmora
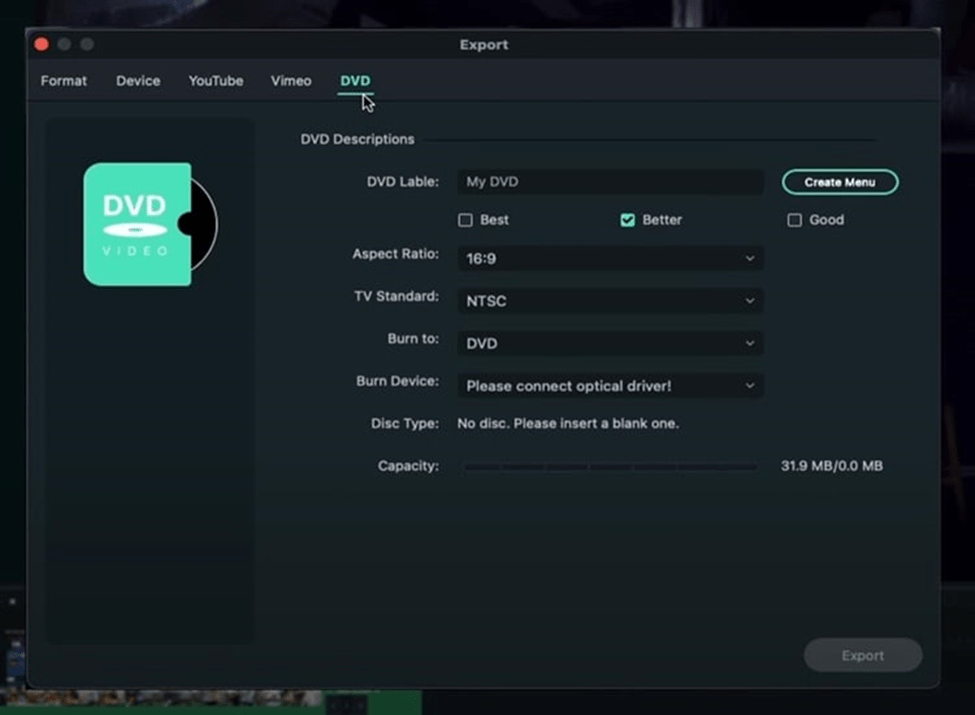
Once your video is ready, it’s time to export it. To do so, you can follow these steps:
- Click the “Export” button in the toolbar.
- Choose the desired export format (e.g., MP4, MOV, AVI).
- Select the resolution and quality settings.
- Choose the destination folder and click “Export”.
Sharing Your Video Using Filmora
After exporting, you can share your video directly from Filmora to various platforms:
- YouTube: Log in to your YouTube account and upload the video.
- Vimeo: Connect to your Vimeo account and share your video.
- Social media: Export and manually upload the video to platforms like Facebook, Instagram, or Twitter.
Conclusion
Filmora is a versatile and user-friendly video editing software that caters to both beginners and experienced editors. By understanding its interface, mastering its features, and utilizing the tips provided, you can create impressive videos with ease. Whether you’re making a school project, a YouTube video, or a professional presentation, you can blindly rely on Filmora.

Written by
Namrata Samal ![]()
Namrata is a skilled content writer with an expertise in writing marketing, tech, business-related topics, and more. She has been writing since 2021 and has written several write-ups. With her journey with Techjockey, she has worked on different genres of content like product descriptions, tech articles, alternate pages,... Read more