How to Make Debit Note and Credit Note Entry in TallyPrime

Summary: Debit notes are the money owed to the seller by the buyer. Whereas credit notes are the money owed to the buyer by a business. Let’s find out what steps do you need to follow to enter these notes in TallyPrime.
Debit and credit notes are two different accounting instruments used by buyers and sellers for different purposes. Most users find entering these numbers in the TallyPrime accounting journal challenging.
There is a certain criterion, that needed to be followed for credit note and debit note entry in Tally. In this guide, you will learn about debit and credit notes, the steps to enter them in TallyPrime, and the key differences between them.
What is a Credit Note in Tally?
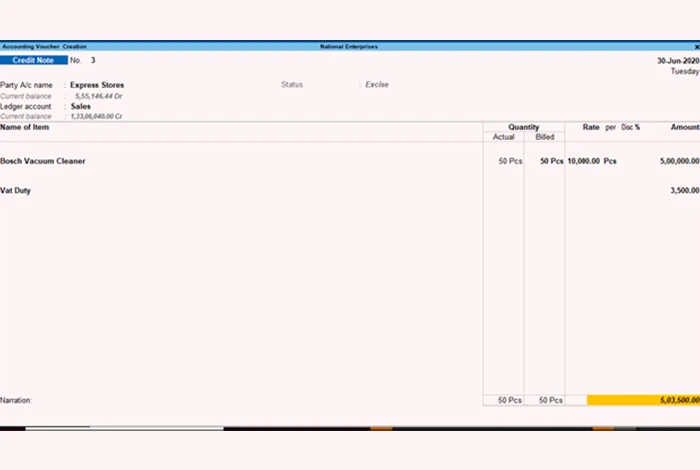
Credit notes are issued by the seller to the buyer when there is a decrease in the amount payable to the seller. By providing a credit note to the buyer, the seller acknowledges the amount that needs to be paid back to the buyer or adjustments that will be made in the next purchase.
They are issued when the damaged goods are sold, an extra amount is charged for goods delivered, the discount is not mentioned in the invoice, etc.
What is a Debit Note in Tally?
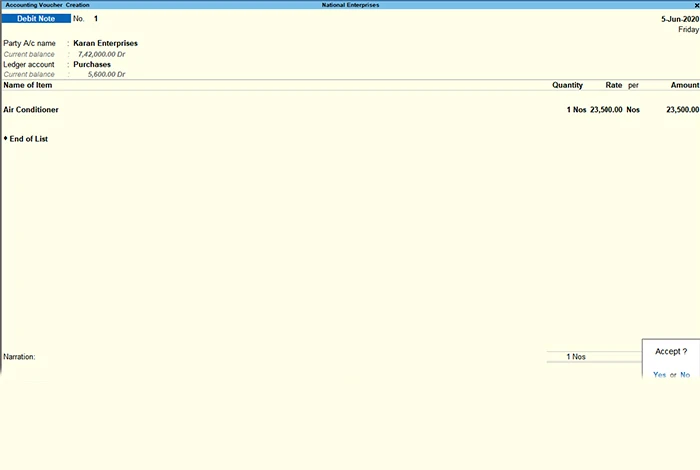
A debit note is a document issued by the vendor to the buyer to notify them about the current debt obligations. It can also be created by the buyer when they return goods received on credit due to any defect or issues. For the returned items, this debit note records all the details including the return reason, date of purchase, number of items, etc.
These notes are different from invoices as they do not request immediate payment and rather work as a reminder for the current debt payments. Therefore, based on debit notes, actual goods are exchanged but payment is done later.
How to Make Credit Note Entry in Tally?
The credit note is issued for sales returns or when there is escalation or de-escalation in price. Credit note entry in Tally can be done in two scenarios when sales returns take place before and after making payment.
- Credit note entry in Tally when the payment is not received yet
Checkout the following steps to make the credit note entry in Tally when sales returns take place before making payment-
Step 1: Open the credit note voucher section and record the buyer’s details.
Step 2: To record buyer details, enter Alt+G, go to create voucher, enter F10 (Other Vouchers), and select Credit Note. Else, go to Gateway of Tally, choose Vouchers, press F10 (Other Vouchers) > select Credit Note, press Enter.
Step 3: Press the keys, Ctrl+H to select the invoice mode as per your business requirements.
Step 4: Under the party details section, enter party name and details like receipt number, date of sales return, etc. If you do not get the Party Details section for original invoice no. and date, tap F12 (Configure), and set the option Provide Receipt, Export and Import details to Yes option.
Step 5: Now, choose the sales ledger to add details about stock items. Simply, select the stock items and add their quantities. The price will remain unchanged if the same item has been sold earlier. However, Tally enables you to enter the amount manually as well.
Step 6: Next, choose bill-wise details. Tap F12 (Configure) > set Use Default Bill-Wise details for Bill Allocation to ‘No’ option. After that, you can choose the bill references in the Bill-wise Details.
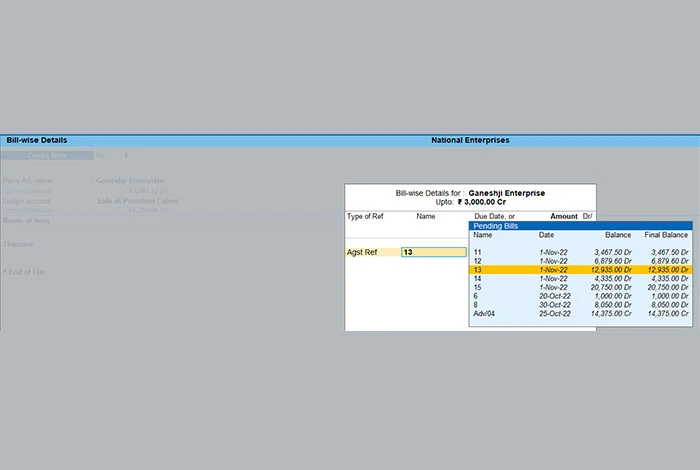

Step 7: Select the Agst Ref in the reference option because you still have not received the payment for the goods sold.
Step 8: Add narration or any other details if required and save them with CTRL+A. After that, the credit note will appear in the credit note register.
Suggested Read: How to Create Performa Invoice in TallyPrime | Tally Alternatives
- Credit note entry in TallyPrime when payment is received
If you are entering the sales returns post payment, choose the reference as New Ref to enter the credit note in Tally. When you mention the reference for the sales invoice, the credit note gets linked with it. Hence, when you create a sales invoice afterwards, you can easily record it against this credit note.
Step 1: Open the Credit Note Voucher and fill in the details of the buyer. For that, press the keys, go to Alt+G (Go To), open Create Voucher, enter F10 (Other Vouchers), and select Credit Note. Or you can open Gateway of Tally, go to Vouchers, press F10 (Other Vouchers) > type Credit Note, and press Enter.
Step 2: Press the keys, Ctrl+H to choose the Invoice Mode as per your business requirements.
Step 3: Add the party account name in the Party Details section and information including the original invoice no., date of sales return, etc. If you can’t see the party details option, tap F12, and set Provide Receipt, Export and Import details to the Yes option.
Step 4: Now, open the sales ledger and fill in the details of stock items. Choose the stock product and enter its quantity. The product’s price will be auto filled as per the products sold earlier. With TallyPrime, you can also enter all this information manually. You can also use the shortcut Alt+C, to quickly add details about a particular stock item.
Step 5: Now, choose and add Bill-wise details. First, press F12 (Configure) > fix Use default Bill-wise details for Bill Allocation to No option. In fact, you can choose the bill references in the Bill-wise Details section unless you change the invoice option in F12.
Step 6: Next, choose the New Ref option in the Reference section since the payment for the sales has been received.
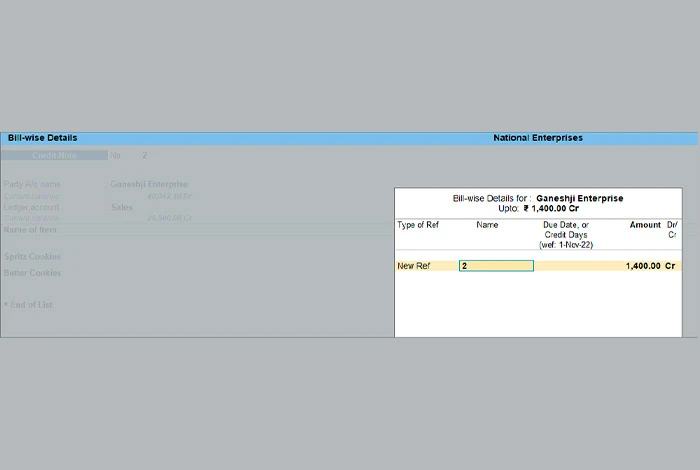

Step 7: Add the narration if required and save all the details with CTRL+A. You can settle this credit note by creating a sales invoice for your customer.
How to Make a Debit Note Entry in Tally?
You can either enter the debit note in voucher mode or invoice mode. Here is the step-by-step guide for recording debit notes in both modes.
To make the entry for Debit Note, follow this-
Step 1: Tally Gateway, open the Voucher section, then press F10 (new vouchers) and select Debit Note> press Enter.
Step 2: Alternatively, enter Alt+G , go to the section create voucher, enter F10 (other vouchers), choose Debit Note Type, and press Enter.
Let’s understand how you can pass the entry for the goods returned to XYZ supplier
Step 1: Press the key, CTRL+ H (change mode) to choose the required mode. For example, choose Item Invoice Mode in this case.
Step 2: Under the Party Account option enter the name and provide all the information related to the supplier including order number, invoice details, the date of purchase returns, etc. In case, if you are not able to see party details on the screen, press the key, F12, and set Provide Dispatch, Order, Import and Export Details to the Yes option.
Step 3: Now, press CTRL+ A to save and proceed to the next step.
Step 4: Choose the Purchase Ledger for allocating all the stock items.
Step 5: Provide the details of all the stock items. Just enter the name and the rate will be auto filled based on the previous transactions. However, you can also enter the rate manually.
Step 6: Now, choose the Bill-Wise Details by pressing the F12 key and set the Default Bill-wise Details for Bill Allocation to No option. You can choose the bill preferences in the bill-wise details section.
Step 7: Provide any narration if required for the debit note.


Step 8: After the debit note entry is completed, press Ctrl+A to save it.
Suggested Read: How to Add Digital Signature in Tally Prime
Debit Note and Credit Note Format
Ensure that you follow the below given format while creating Debit and Credit Notes under GST:
- Enter the name, address, and GSTIN number of the supplier.
- Mention the nature of the document.
- Use consecutive numbers and alphabets for a particular financial year.
- Mention the date of issue of the debit or credit note
- Enter the name, address, and GSTIN number of the recipient if he/she has registered.
- If the recipient is unregistered, enter his/her name, and address along with the delivery address, state code, etc.
- Mention the serial number and date of the tax invoice or the supply bill.
- Enter the goods’ taxable amount, the tax rate, the amount of tax credited, etc.
- Add the supplier’s digital signature or the authorized person associated.
Debit Note vs Credit Note
| Metrics | Debit Note | Credit Note |
| Meaning | The buyer issues a debit note to the seller for returning the products due to poor quality or other reasons. The note specifies the reason for goods’ return. | The seller of goods provides a credit note to acknowledge the acceptance of purchase return. |
| Issuer | Buyer and Seller | Seller |
| Issue Condition | Issued at the time of credit purchase or when defective products are returned | Issued at the time of credit sales |
| Impact | Decrease account receivables in the seller’s account book | Decrease account payables in the buyer’s account book |
| Reflect | It reflects a positive amount | It reflects a negative amount |
| Form | Form of purchase return | Form of sales return |
| Entry | Supplier Account Dr. Purchase return Cr | Sales return account Dr. Customer Account Cr. |
| Issued for exchange of | In exchange for credit note | In exchange for debit note |
| Ink Used | Issued in blue ink | Issued in red ink |
| Accounting | Need to update purchase return books | Need to update sales return books |
Related Categories: GST Software | Expense Management Software | Income Tax Software | Debt Collection Software | Quoting Software | Pricing Software
FAQs
How to pass credit note entry in TallyPrime?
To pass a credit note entry in Tally, you need to select the voucher, add the buyer’s details, allocate stock items in the sales ledger, fill bill-wise details. Now, you need to select the Agst Ref option in the reference section if you have not received the payment. However, you can choose a new ref when you have received the payment. After that, add narration if required and save the changes, the credit note will be saved in the credit register.
What is the credit note entry in Tally?
A credit note entry in Tally states the buyer’s account has been credited in the seller’s books of account in the case of sales returns, escalation or de-escalation in price, etc. In Tally Prime, you can record the credit note in either the voucher or invoice mode.
What is the entry for debit note in Tally?
Debit Note is a document issued by the seller to the buyer notifying that you are debiting his/her account in the seller’s accounting books generally notifying them about their current debt obligations. It is also issued by the buyer to the seller in case of purchase returns.
How to pass credit note entry in Tally for GST?
To pass a credit note entry in Tally for GST, you need to name, address, and GSTN of supplier, add consecutive serial numbers, etc. Once done, mention all the details of the recipient along with the address and GSTN number, and the corresponding number of the supply bill. After that, you need to add the taxable amount of goods and tax rate. In the end, you need to add the digital signature of the supplier and save the credit note in the credit register.
Varsha is an experienced content writer at Techjockey. She has been writing since 2021 and has covered several industries in her writing like fashion, technology, automobile, interior design, etc. Over the span of 1 year, she has written 100+ blogs focusing on security, finance, accounts, inventory, human resources,... Read more


