How to Change the Format of Embroidery Designs with Wilcom Software
If you are reading this, then you are either an individual or business who works with software systems for embroidery designs. Now you might be working with Wilcom Embroidery Studio e3 or above, or any other computer embroidery work designs. However, you want to change the format of embroidery design file(s) to a compatible format, so that you can work with it.
If this is the case, you have come to the right place.
What is Wilcom Software?
Wilcom is an multi-decoration & embroidery software that provides various solutions to make tasks of embroiders and textile designers easier. With its Embroidery Studio series, it helps embroiders to conceptualise their designs accurately to be used as a reference. Wilcom software provides solutions for embroidery designs for beginners as well as experts.
In addition, this free embroidery software provides designs in the form of customizable templates that can be modified according to ones needs.
However, if you are looking specifically to change the format of a design file, here is how you can do it:
Changing the Format of Embroidery Designs in Wilcom Software
- Converting EMB Files from Older Version to Newer Version
- Changing EMB Files to Other Formats
- Converting a Design File into a Machine File
There are a number of various reasons why you need to convert the format of computer embroidery work designs. Given below are four main ways you can change the format of embroidery designs in different cases.
Converting EMB Files from Older Version to Newer Version
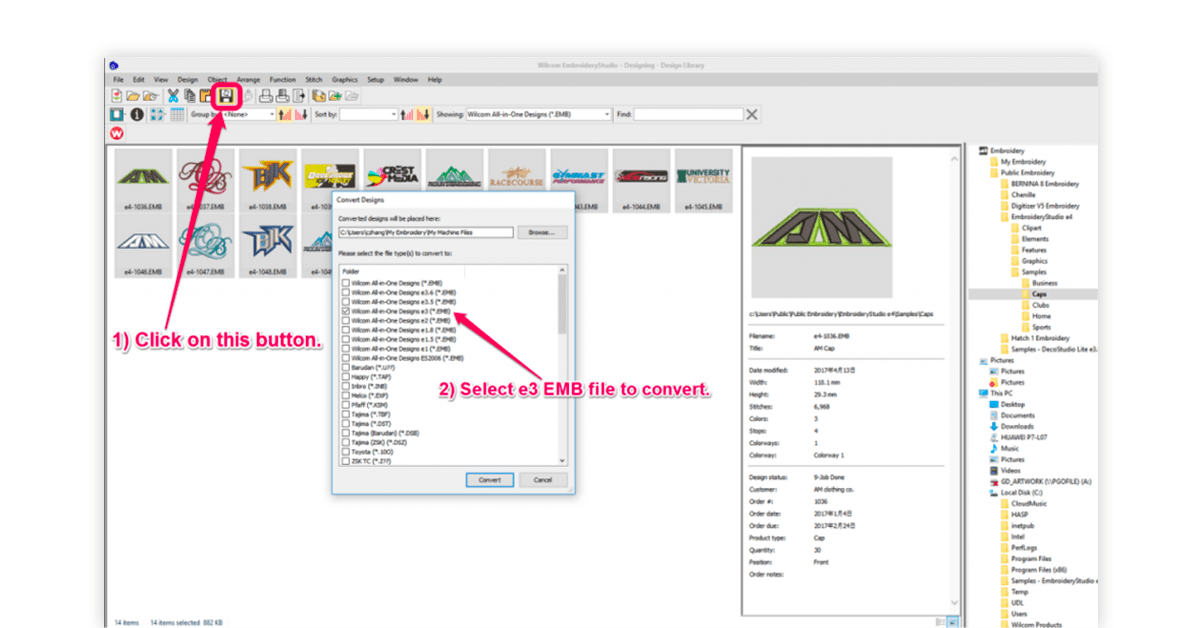
If you have been using an older version of Wilcom, such as Wilcom Embroidery Studio e3, and upgraded to higher version, the files with old formats might not open. To remedy this, the files with older EMB formats need to be converted to be accessible with newer versions. Here is how you can make those files work again:
- After downloading the latest version of Wilcom Embroidery Studio, open the interface and click on the button that looks like a floppy icon (like save button) with paint-bucket embedded in between.
- Select all the old e3 EMB files in the Design Library that are required to be converted.
- Check the boxes in front of all the files that you require for future use and click on ‘Convert’ as shown in the screenshot.
In addition, converting all the files rather than one, helps in saving the hassles of doing this repeatedly. This ensures a smooth workflow, especially during elaborate projects. The conversion ensures uninterrupted project workflows in the following ways:
- The files with older EMB formats can now be saved in the new e4 formats.
- All the old EMB batch versions can be converted in a single batch and be saved in a new folder, without deleting the old files.
Changing EMB Files to Other Formats
By default, Wilcom Embroidery Studio e3 or subsequent versions save designs to its native EMB format. The EMB format files contain all the minute data required for stitching a design, pattern creation and modification. As discussed earlier, the conversion of files from Design Library helps in converting EMB in batches.
Therefore, this feature can also help collectively convert multiple embroidery designs so that it can be used in any other compatible software such as Corel Draw software. Here is how you can convert multiple EMB file formats to other formats in batches.
- After opening Wilcom Embroidery Studio’s interface, click on the button that looks like a floppy icon (like save button) with paint-bucket embedded in between.
- Browse/Enter the source path where the EMB files are located.
- Check the boxes of all the files that are required to be converted in a specific file format.
- Next, click on ‘Convert’. As you click, a dialog box will appear listing all the available file formats supported by Wilcom software.
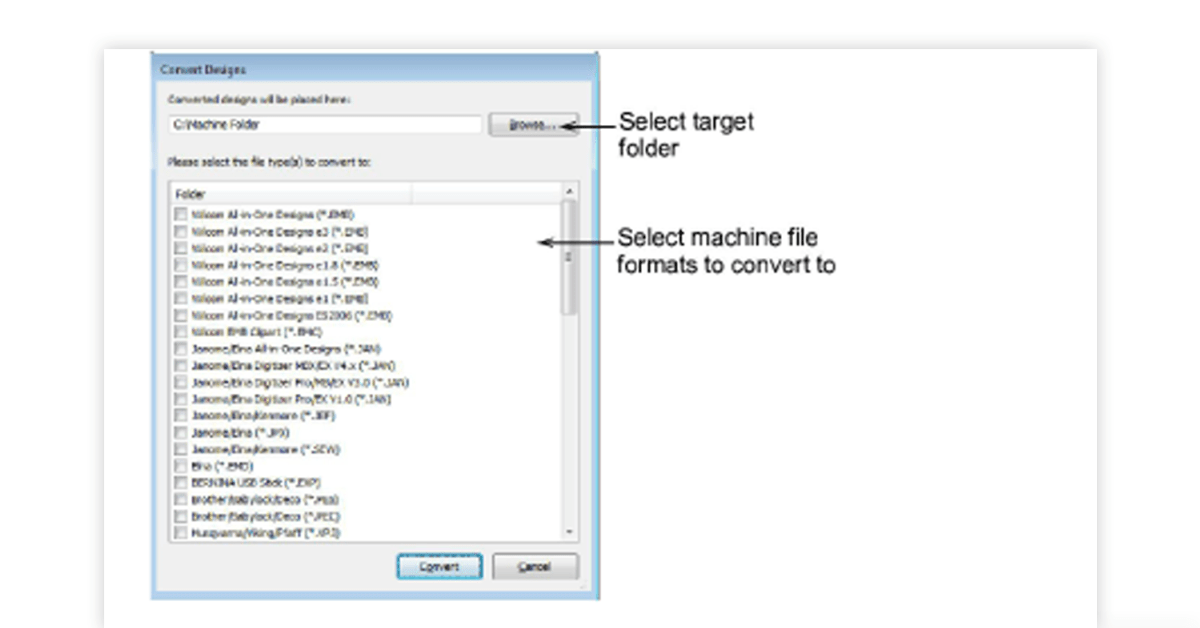
- Select all the files that are to be converted to a specific file format.
- Click ‘Browse’ to locate a destination folder for the converted designs.
- Next, click ‘Convert’ to start the conversion. The converted embroidery designs will be saved in the designated folder.
If you wish to change embroidery designs in two or more different file formats you can only do it at a time, as you get the option to choose one format per conversion.
Converting a Design File into a Machine File
Apart from different software file formats, Wilcom software also assists in converting design files to universal machine formats such as SEW, EXP, and DST. To saving a design file to a machine file format, just go to the ‘File’ menu and then click on ‘Export Machine File’.
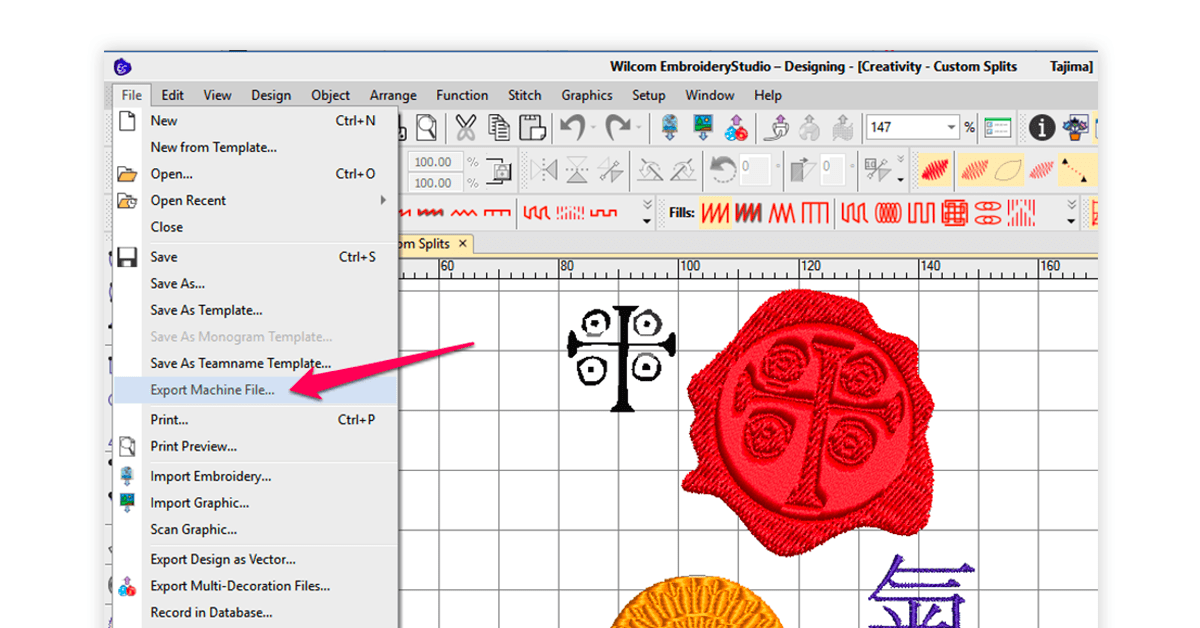
The ‘Export Machine File’ is enabled only when the design is saved as an internal design file. Alternatively, it can also be saved as a template to be used for future projects.Hope this step-by-step guide provided an easy walk-through on how to convert formats in different cases. Are we missed out on something? Do let us know.
Anurag Vats is an in-house technical content writer at Techjockey who is fond of exploring the latest avenues in the field of technology and gadgets. An avid reader of fiction and poetry, he also likes to dabble with brushes and poetry and loves to cook in borrowed kitchens.... Read more


