


Are you selling products or services online and wondering how to safely accept payments from your customers? This is where a payment gateway comes in. A payment gateway is like a bridge between your website and the bank that handles your customer’s payment. It makes sure that the transaction is secure and smooth.
However, setting up a payment gateway can seem confusing and scary, you might be wondering, “How do I start?” or “What if I make a mistake?”, especially if you’re new to it. So, In this guide we’ll walk you through the process step-by-step, using simple language and easy-to-follow instructions.
By the end of this guide, you’ll learn the steps to integrate it into your website, best practices to follow, and how to tackle common challenges.
What is a Payment Gateway?
A payment gateway is a special service that helps process online payments for your business. Think of it as a secure tunnel that takes your customer’s payment information and sends it to the bank for approval. Once the bank approves, the payment gateway sends the confirmation back to your website, completing the transaction.
Suggested: Read out comprehensive guide on What is a Payment Gateway and How Does it Work?
How to setup a payment gateway: A general guide
Here’s a general guide to help you through the process:
- Choose a Payment Gateway: Pick a service like Razorpay, PayU or Stripe to handle online payments. Look at their features and costs.
- Sign Up: Create a merchant account by providing your business information and bank details.
- Integrate the Gateway:
- API Integration: Follow the instructions given by your selected payment gateway to connect the payment service to your website or app.
- Plugins: Use your selected payment gateway plugins if you’re on platforms like Shopify or WooCommerce.
- Set Up Payment Methods: Configure which types of payments you want to accept, like credit cards or digital wallets.
- Test Payments: Use test environments to make sure payments work without using real money.
Step-by-Step Guide to Setting Up a Razorpay Payment Gateway
For a better understanding of how to set up a payment gateway, let’s use Razorpay as an example. Most payment gateways follow a similar process, so this will give you a good idea of what to expect.
Step 1: Find the best payment gateway provider
Though we have used Razorpay, the first step is to find the best payment gateway provider. You need to research and select a payment gateway provider that suits your business needs.
Suggested Read: Buyer’s Guide on how to choose the best Payment Gateway Software for your requirements.
Step 2: Sign up Process
Sign up for an account with your chosen payment gateway provider. Click on the Sign Up link, provide necessary business details and complete the registration process.

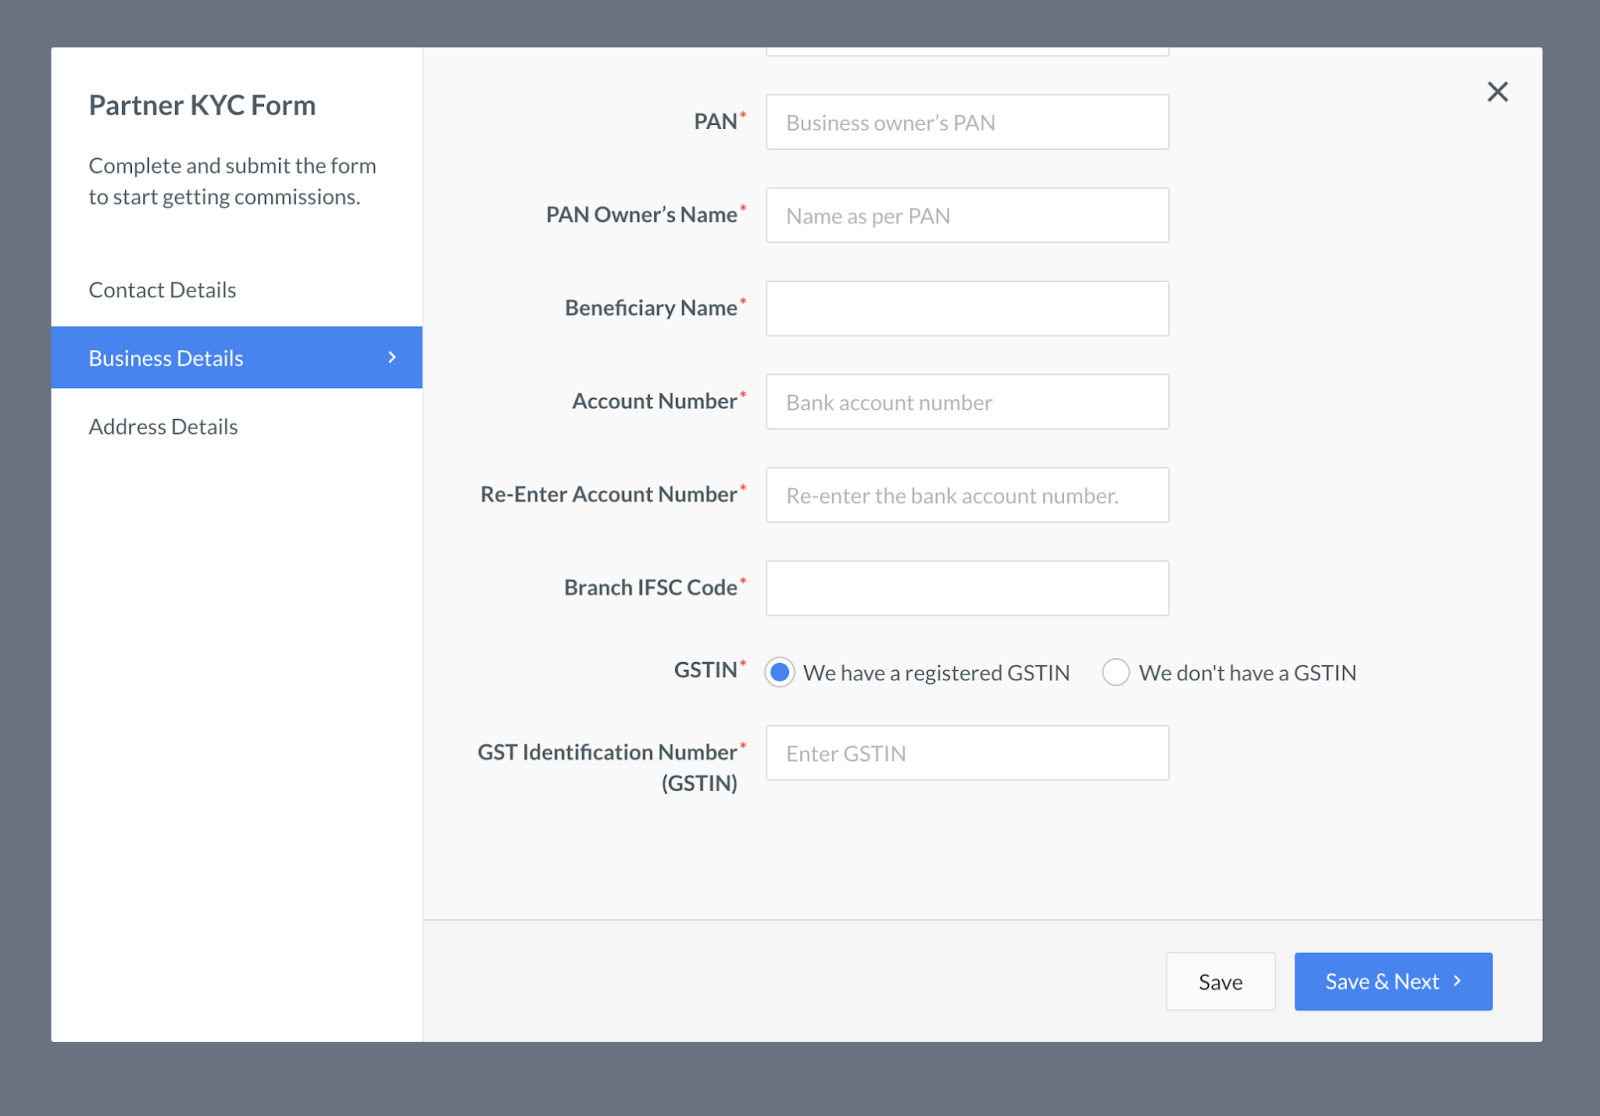
Step 3: Fill the KYC Details
Provide all the necessary KYC details like Contact details, Business details and Address details.
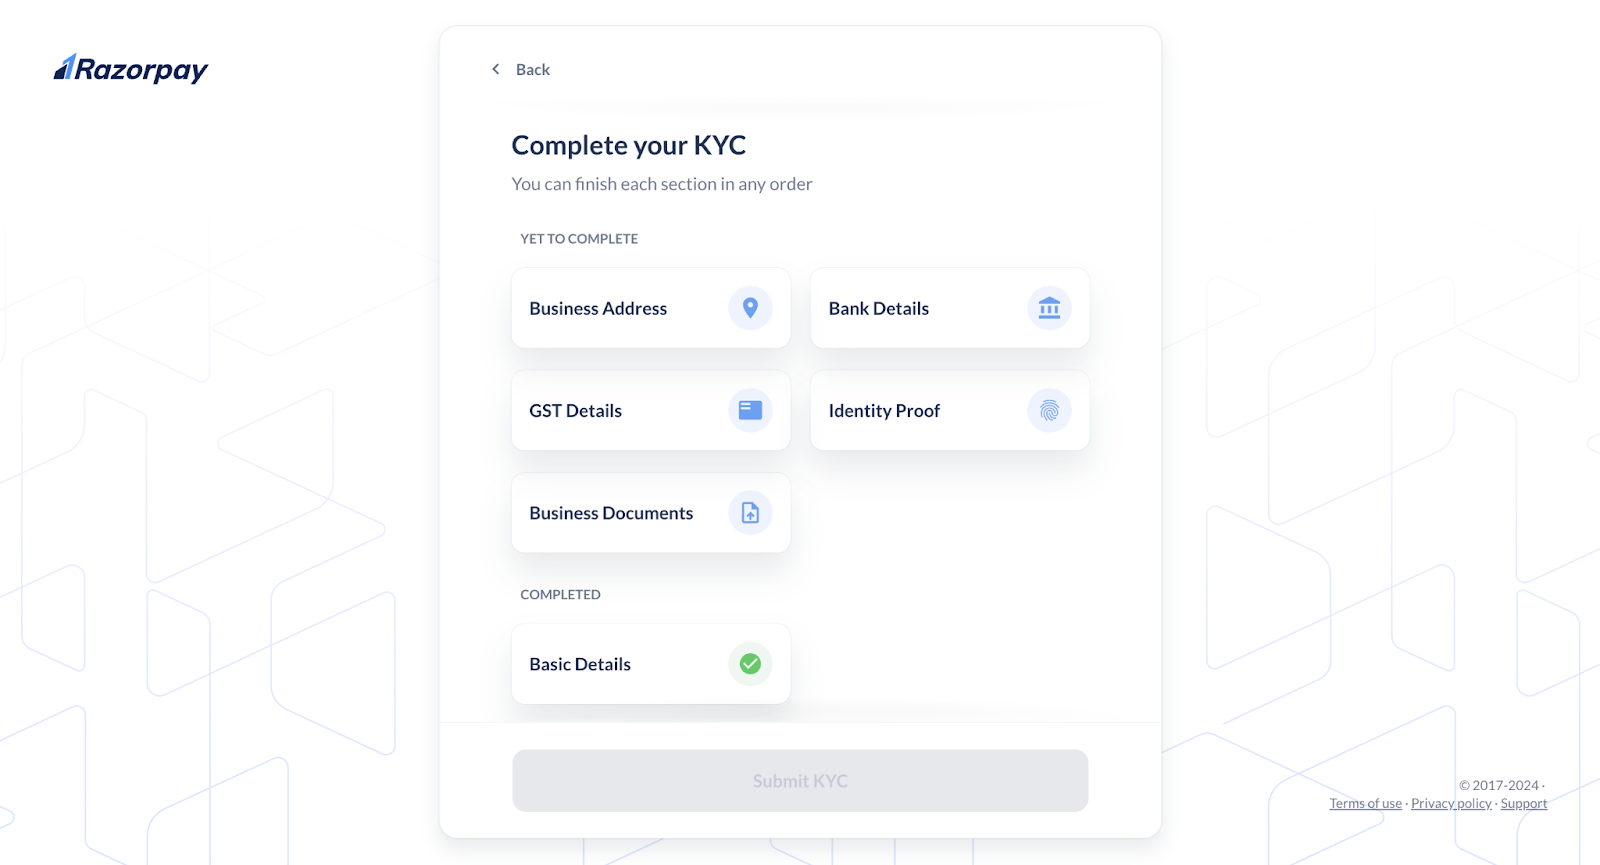
Step 4: KYC verification
Now that you have updated the details for your KYC, it’s time to verify them. KYC verification is important in any payment gateway because it helps businesses to activate their account and get rid of any limitations the account might have. Submit the documents for the details you have provided such as ID proof, Address proof, Bank proof etc. Once submitted, your account will be activated within the given time.
Step 5: Integrate the gateway to your online website
The last step on setting up your payment gateway is to integrate the gateway to your online website so that you can start accepting payments from the customers. This process involves a couple of steps. Let’s understand how you can integrate a payment gateway to your website:
How to Integrate a Payment Gateway with Your Website?
There are multiple ways to integrate a payment gateway to your online store. Let’s take a look:
Integration through Plugin or App
One of the easiest and most straightforward ways to integrate a payment gateway into your online store is through a plugin or app. This method allows you to directly install a payment gateway provider’s app on your website. For example, if you are using WordPress for your online store, follow these steps below:
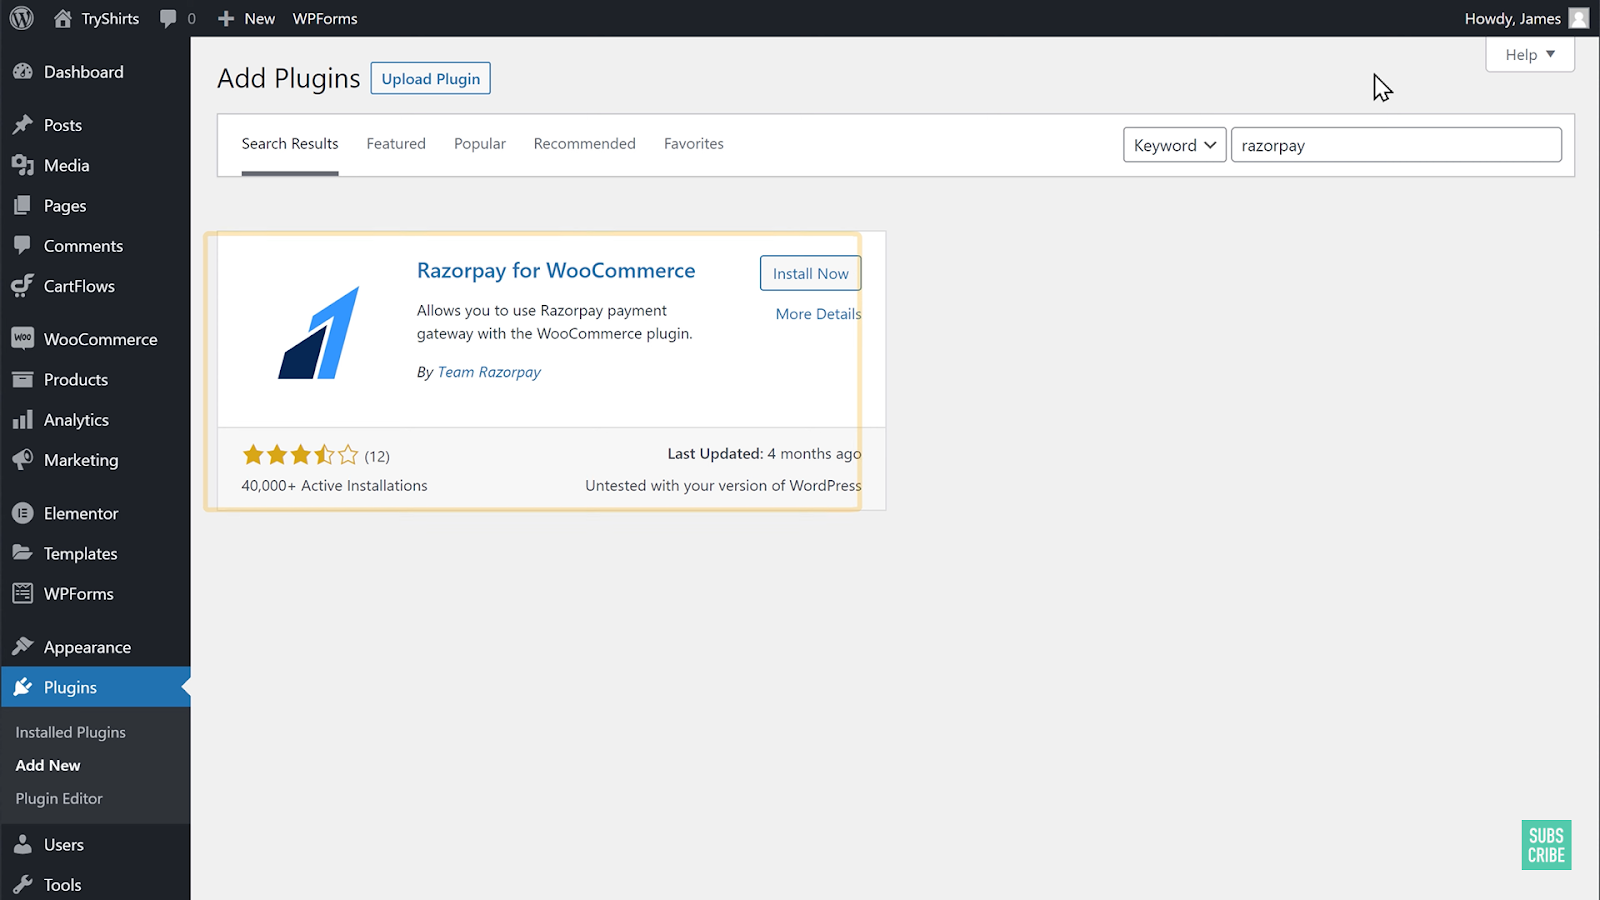
Step 1: Login to your WordPress dashboard
Login to your WordPress dashboard and click on the “Plugin” option on the bottom left corner, then click on the “Add New” button.

Step 2: Install Razorpay Plugin
On the top right corner, search for Razorpay (or the payment gateway platform you chose) and enter. You can see the Razorpay application on the screen. Click on the “Install Now” option to install it. Once it’s done, hit the “Activate” button.
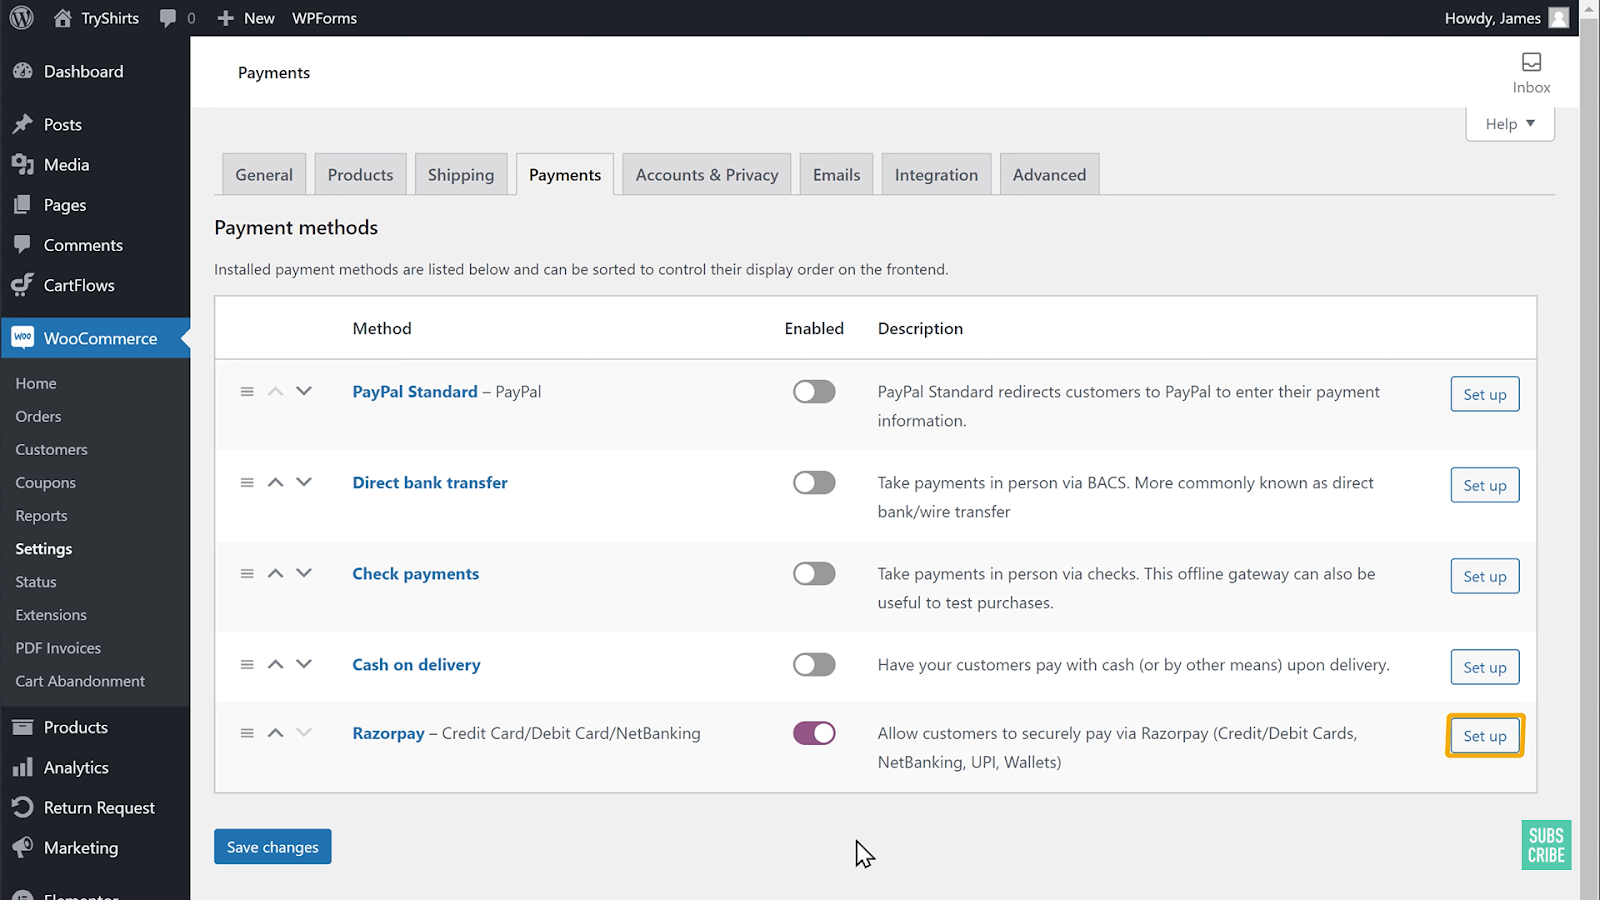
Step 3: Enable Razorpay as your payment gateway.
Once activated, go back and click on the Woocommerce option on your dashboard, visit the Payments section, Enable Razorpay as a payment method and click on Set Up your payment gateway.
Step 4: Connect your Razorpay account to your website
Now, to connect your Razorpay account to your website, you need the Key ID and Key Secret.
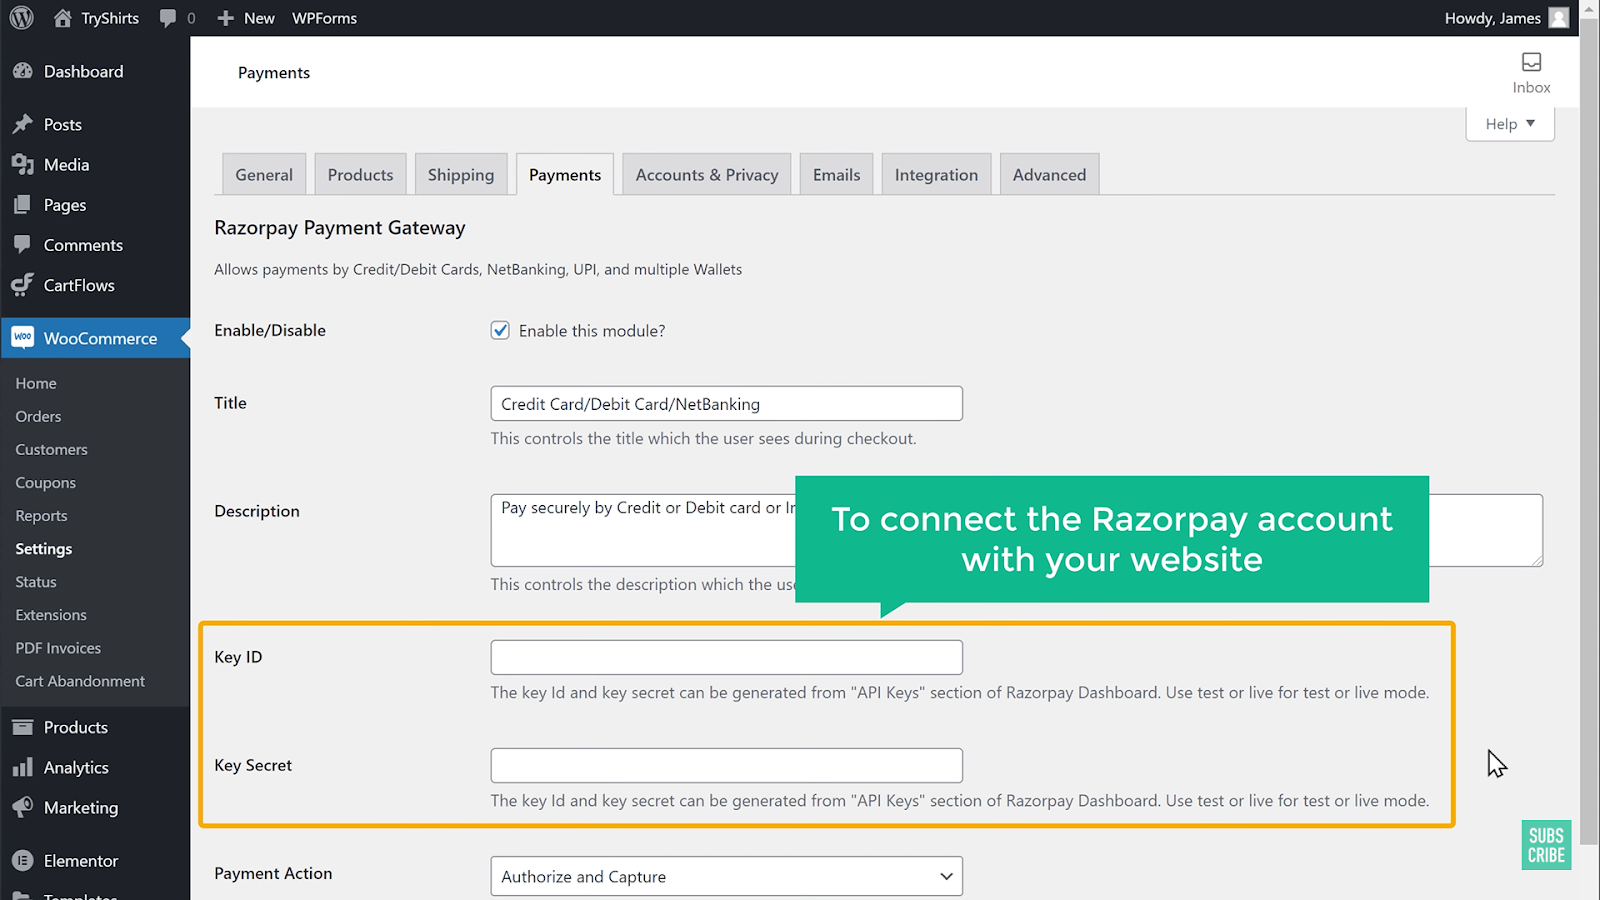
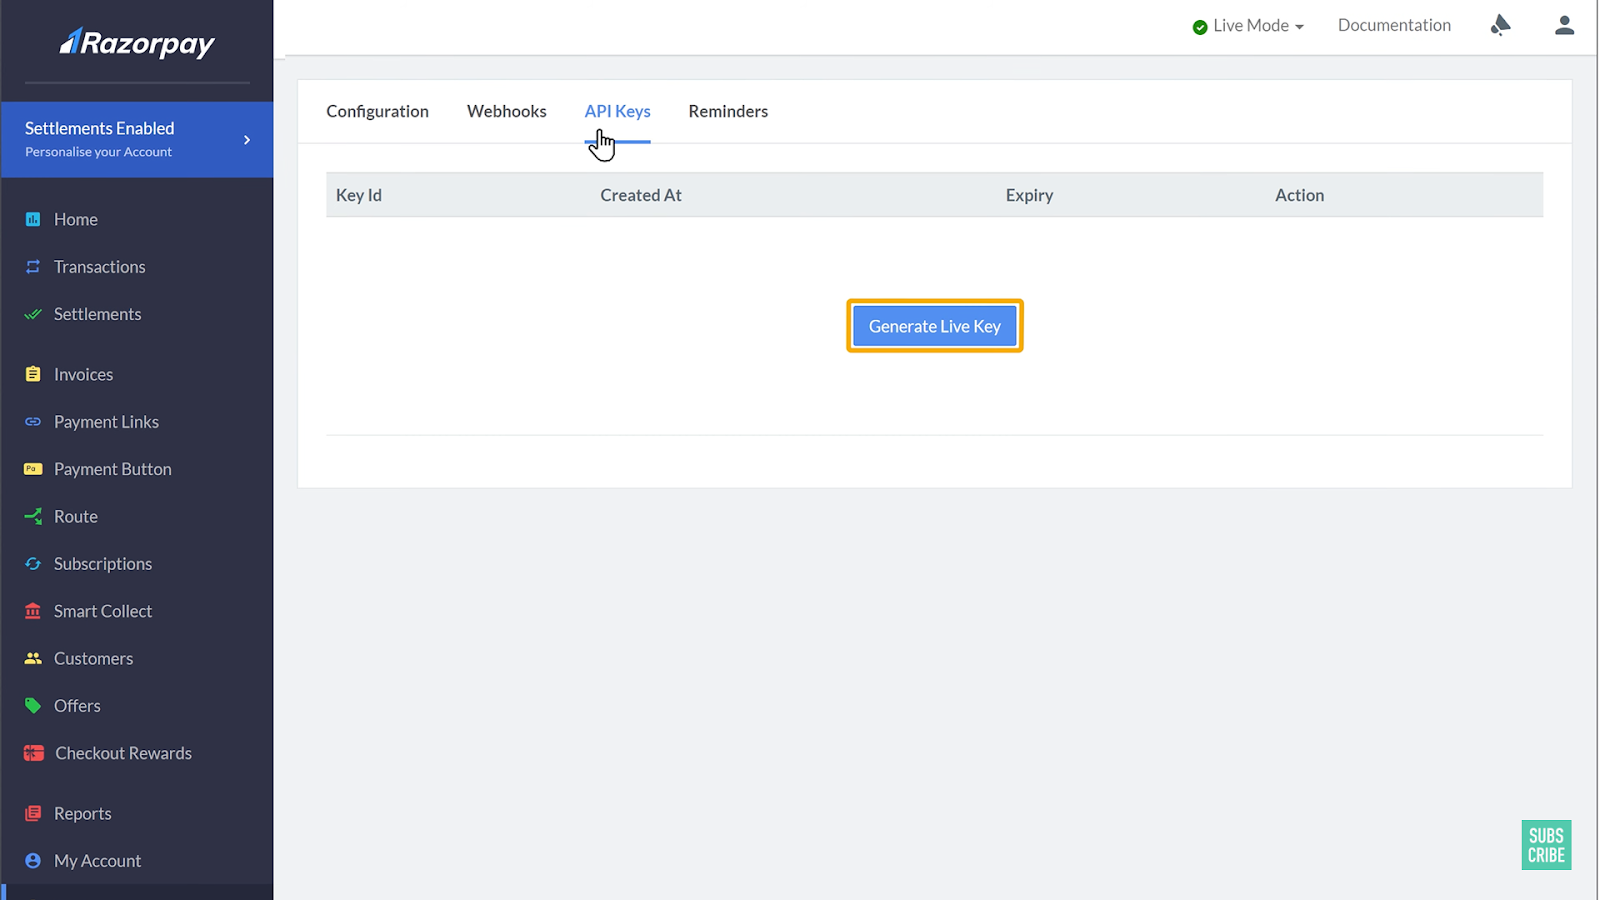
Step 5: Generate Live Key and integrate Razorpay payment gateway
To get the Key ID and Secret Key, go to your Razorpay dashboard > Settings, then click on API Keys, and then hit the Generate Live Key button. Once clicked, you will receive your unique Key ID and Secret Key. Copy those credentials and paste those details (as shown in the 4th Step) and save the changes. Your Razorpay payment gateway has been successfully integrated to your website.
Self-hosted (API-based) Payment Gateways
Self-hosted gateways allow you to handle transactions directly on your website using APIs provided by the payment gateway. To integrate Razorpay (or your favourite Payment Gateway) in a self–hosted environment. Here are the steps to integrate Razorpay into your React app:
1. Create a Razorpay Account
- Go to the Razorpay website and create an account.
- In the Razorpay Dashboard, go to the Settings tab and generate your API keys (as shown in above steps). Save these keys.
2. Set Up Your Server
- Create a new folder on your computer for your project and open it in your terminal.
- Initialize npm in your folder by running `npm init`.
- Install the required packages by running: `npm install express razorpay dotenv crypto mongoose`.
3. Create Your Server File
- Create a file named `server.js` in your project folder.
- Add the following code to `server.js` to set up your Express server:
```javascript

const express = require("express");

const app = express();

const port = process.env.PORT || 5000;

app.use(express.json({ extended: false }));

app.listen(port, () => console.log(`Server started on port ${port}`));

```
4. Save Your API Keys
- Create a file named `.env` in your project folder.
- Add your API keys to the `.env` file like this:
```plaintext

RAZORPAY_SECRET=<your razorpay secret>

RAZORPAY_KEY_ID=<your razorpay key id>

```
5. Add Route for Creating Orders
- Create a folder named `routes` in your project folder.
- Inside the `routes` folder, create a file named `payment.js`.
- Add the following code to `payment.js`:
```javascript

require("dotenv").config();

const express = require("express");

const Razorpay = require("razorpay");

const router = express.Router();

router.post("/orders", async (req, res) => {

    try {

        const instance = new Razorpay({

            key_id: process.env.RAZORPAY_KEY_ID,

            key_secret: process.env.RAZORPAY_SECRET,

        });

        const options = {

            amount: 50000, // amount in smallest currency unit

            currency: "INR",

            receipt: "receipt_order_74394",

        };

        const order = await instance.orders.create(options);

        if (!order) return res.status(500).send("Some error occurred");

        res.json(order);

    } catch (error) {

        res.status(500).send(error);

    }

});

module.exports = router;

```
6. Import the Route in `server.js`
Update your `server.js` file to include the new route:
```javascript

const express = require("express");

const app = express();

const port = process.env.PORT || 5000;

app.use(express.json({ extended: false }));

app.use("/payment", require("./routes/payment"));

app.listen(port, () => console.log(`Server started on port ${port}`));

```
7. Create a React App
- Inside your project folder, create a React app by running: `npx create-react-app client`.
- Navigate into your React app folder: `cd client`.
- Install Axios for making HTTP requests by running: `npm install axios`.
8. Add a Payment Button
In your React app, open the `src/App.js` file and replace the code with:
```javascript
import React from "react";
import logo from "./logo.svg";
import "./App.css";
import axios from "axios";

function App() {
    function loadScript(src) {
        return new Promise((resolve) => {
            const script = document.createElement("script");
            script.src = src;
            script.onload = () => {
                resolve(true);
            };
            script.onerror = () => {
                resolve(false);
            };
            document.body.appendChild(script);
        });
    }

    async function displayRazorpay() {
        const res = await loadScript("https://checkout.razorpay.com/v1/checkout.js");

        if (!res) {
            alert("Razorpay SDK failed to load. Are you online?");
            return;
        }

        const result = await axios.post("http://localhost:5000/payment/orders");

        if (!result) {
            alert("Server error. Are you online?");
            return;
        }

        const { amount, id: order_id, currency } = result.data;

        const options = {
            key: "rzp_test_r6FiJfddJh76SI", // Enter the Key ID generated from the Dashboard
            amount: amount.toString(),
            currency: currency,
            name: "Your Company Name",
            description: "Test Transaction",
            image: { logo },
            order_id: order_id,
            handler: async function (response) {
                const data = {
                    orderCreationId: order_id,
                    razorpayPaymentId: response.razorpay_payment_id,
                    razorpayOrderId: response.razorpay_order_id,
                    razorpaySignature: response.razorpay_signature,
                };

                const result = await axios.post("http://localhost:5000/payment/success", data);

                alert(result.data.msg);
            },
            prefill: {
                name: "Your Name",
                email: "YourEmail@example.com",
                contact: "9999999999",
            },
            notes: {
                address: "Your Address",
            },
            theme: {
                color: "#61dafb",
            },
        };

        const paymentObject = new window.Razorpay(options);
        paymentObject.open();
    }

    return (
        <div className="App">
            <header className="App-header">
                <img src={logo} className="App-logo" alt="logo" />
                <p>Buy React now!</p>
                <button className="App-link" onClick={displayRazorpay}>
                    Pay ₹500
                </button>
            </header>
        </div>
    );
}

export default App;
```
9. Verify the Payment
In your `routes/payment.js` file, add the following code to verify the payment:
```javascript

router.post("/success", async (req, res) => {

    try {

        const { orderCreationId, razorpayPaymentId, razorpayOrderId, razorpaySignature } = req.body;

        const shasum = crypto.createHmac("sha256", process.env.RAZORPAY_SECRET);

        shasum.update(`${orderCreationId}|${razorpayPaymentId}`);

        const digest = shasum.digest("hex");

        if (digest !== razorpaySignature) return res.status(400).json({ msg: "Transaction not legit!" });

        res.json({ msg: "success", orderId: razorpayOrderId, paymentId: razorpayPaymentId });

    } catch (error) {

        res.status(500).send(error);

    }

});

```
10. Test Your Integration
- Run your server by navigating to your project folder in the terminal and typing: `node server.js`.
- Run your React app by navigating to the client folder and typing: `npm start`.
- Open your React app in the browser, click the Pay ₹500 button, and follow the instructions.
That’s it! You have now integrated Razorpay into your React app.
Common Challenges in Payment Gateway Integration and How to Overcome Them
Integrating a payment gateway like Razorpay can be tricky. Here are some common problems you might face and how to solve them:
1. Managing API Keys
Problem: Keeping your API keys safe.
Solution:
- Store your API keys in a special file (.env file) and not directly in your code.
- Change your API keys regularly and watch for any unusual activity.
2. Supporting Different Payment Methods
Problem: Handling different ways people pay (cards, net banking, wallets, etc.).
Solution:
- Choose a payment gateway that supports various payment methods, like Razorpay.
- Follow the gateway’s instructions carefully to set up each payment method.
- Test each method thoroughly to ensure it works properly.
3. Managing Payment Failures
Problem: Handling situations where payments don’t go through.
Solution:
- Implement error handling and retry logic for temporary issues.
- Provide clear error messages to users when a payment fails.
- Log payment attempts and failures for troubleshooting.
4. Verifying Transactions
Problem: Making sure payments are real and not fake.
Solution:
- Use the payment gateway’s fraud detection tools.
- Verify transactions on your server using webhooks or APIs.
- Check transaction details (like amount and order ID) before finalizing orders.
5. Testing the Integration
Problem: Ensuring everything works correctly before going live.
Solution:
- Use the payment gateway’s test environment to check your integration.
- Create test cases for different scenarios (successful and failed payments, etc.).
- Test with real payment methods before launching.
6. Handling Different Currencies
Problem: Supporting multiple currencies and localizations.
Solution:
- Set up your payment gateway to accept various currencies.
- Show prices in the user’s local currency.
- Handle currency conversion correctly if needed.
7. Improving User Experience
Problem: Making the payment process easy and smooth for users.
Solution:
- Ensure the payment steps are simple and clear.
- Use the payment gateway’s customizable checkout options to match your site’s design.
- Provide clear instructions and feedback during the payment process.
8. Following Legal Rules
Problem: Meeting local and international laws for online payments.
Solution:
- Stay updated on the legal requirements in the areas you operate.
- Work with your payment gateway provider to ensure compliance.
- Implement necessary measures for data protection and privacy.
Wrapping Up
Setting up a payment gateway might seem hard, but it’s important for running a business online. By following the steps and using the right tools, you can make the process easier. Choose a good payment gateway, follow the instructions carefully, and test everything before going live. This way, you can ensure that your customers can pay you easily and securely.

Written by
Shubham Roy
![]()
Shubham Roy is an experienced writer with a strong Technical and Business background. With over three years of experience as a content writer, he has honed his skills in various domains, including technical writing, business, software, Travel, Food and finance. His passion for creating engaging and informative content... Read more


